Guest Blog: Thierry Mugler Angel Review

Posted by Lipglossiping On June - 23 - 2014

I was pretty darn thrilled when one of my long-time readers offered up her services for a guest post.  You see, Lisa Wordbird has a bit of a way with… um, well… words and I remembering thoroughly enjoying her thoughts on that Brad Pitt/Chanel advert and clever musings on how brands should embrace their more “human” qualities.

Anyway, Lisa offered to team up with her friend Samantha from IScentYouADay.com, and together, they have delivered a brilliant conversational rally (in the wonderful FaceGoop style) on the marmite fragrance that is: Thierry Mugler’s Angel.

Take it away ladies…

thierry-mugler-angel-50ml-edp-w--2250-p

Hello IScentYouADay, it’s Wordbird here.  How nice is it that Lipglossiping is prepared to give us a guest slot on her blog?  I bet she’s busy with that gorgeous baby of hers.  So let’s sneak in quietly so we don’t wake him up.

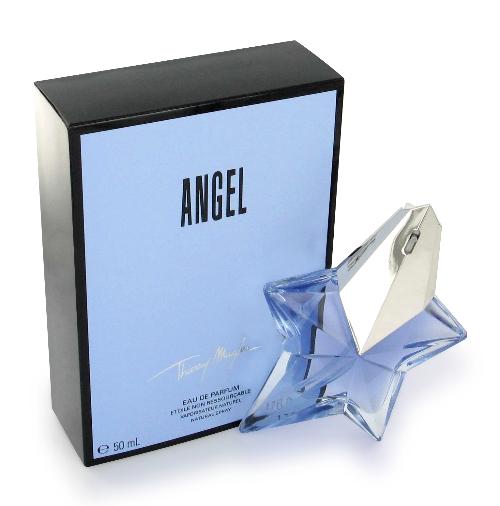
WB: I have been thinking about perfume and Thierry Mugler.  You know how all his perfumes are MAHOOSIVE?  Do you think that’s anything to do with his bodybuilding?  Do you think that his perfumes are swollen as if they were on steroids?  It might explain a lot.  Especially about Angel.

ISYAD: Angel is not only on steroids but it wears Brut for Men and covers itself in chocolate in the hope of landing a date.  If it was a man it would have a very hairy chest and a medallion.  It even has power over yours truly, because I am strangely fascinated by it.  Can I tell you a secret?  We’re quite safe here on the Internet, right?  Here goes then: sometimes I sit at home in the evening and wear Angel and sniff and sniff and sniff.  It’s like my nemesis but it keeps my attention like that snake off the Jungle Book.

WB: Well that’s quite an admission, but we’re all friends here.  I get absolutely the same thing from Angel: Chocolate Brut.  (Actually, I wonder what the Angel Man perfume A*Men smells like? Double Chocolate Brut?)  It is too scary for me even to approach, so – coward that I am – I spray it on my adorable 9 year old daughter and on her it smells divine.  There are theories about why this happens.  Apparently the moistness of your skin is important.  I’m all dried up and bitter, I mean flaky (actually that’s not much better, is it?) while my darling daughter is practically perfect in every way, so that might explain something.  Since you have a secret Angel habit, try moisturising one arm and see if it makes a difference.

ISYAD: Oh yes I remember how your girl got caught in the crossfire of one of our perfume testathons, not that she minded: having you as a Mum she sees this as normal.  Can I just say that she is the luckiest nine year old I know thanks to her access to the kind of perfume collection that would make a grown woman work out when you are away and break into your bedroom?  Just add your holidays to my Google Calendar and I will um… make sure nobody does that.

Back to Angel – I could try moisturising my skin before wearing scent and in fact I do this on my neck and chest as it gets the biggest blast of scent and sun throughout the year, but my arms?  I usually forget.  Incidentally, my sister in law, who I am always giving samples to, came over the other day smelling lovely. I asked her what it was, not recognising it at all.  It was a warm floral with a hint of the Oriental. I was amazed to hear it was Angel.  She had really taken a shine to it and I didn’t even recognise it on her. Go figure.


Thank you so much ladies, I do hope you’ll do some more fragrant musings for us in the future?!  And for the record, I’m also far too parched and barren to have any love for Thierry Mugler Angel.  Indeed, it’s the only fragrance I’ve ever found that has the magical ability to involuntarily turn my lips inside out in an expression of utter distaste.  Shudder.

How about you?  Do you take delight in the marmite love-it-or-hate-it fragrance that is, Angel?


Guest Post: Separate storage?

Posted by Lipglossiping On March - 28 - 2013

I’m delighted to introduce Abby from Un-observed to the blog.  Abby blogs about beauty, fashion, lifestyle, and decor and is guest-posting for me today about keeping a selection of oft-used products easily to hand.  Is this something you do?

I tend to keep my most used products in a basket on my dressing table. Some days I don’t want to trawl through my drawers to find something I use regularly.  The products I have on my dressing table often change though.  And I like to add things to it that I have forgot about, just so things don’t go un-loved.

Uncovering-the-unloved_02

Here are a few of my favourite products which I currently have on my dressing table.

Uncovering-the-unloved_03

First up is L’Oreal’s Color Appeal Eye Shadow in ‘Platinum Beige’.  I never used to sway from my Naked and MAC palettes, but saw this shade while going on a mad swatching session in Boots.  I love the shade on me and the texture Feels almost creamy.

I’m currently using a sample of Clinique’s High Impact mascara. I have been through a few tubes of it in the past and love how it gives my lashes a real full effect without being clumpy. The formula is wet, which allows it to grip onto the tiniest of lashes but dries pretty quickly. It doesn’t transfer under my eyes (which is a major plus for me) and it’s so easy to remove. I must get round to purchasing a full size again.

I am currently in love with Revlon’s fairly newly-released ‘Nearly naked’ foundation. I purchased it a few weeks ago and I still love it, if not more. I would say my skin is fairly clear. Nothing a good concealer can’t cover up, so I don’t like to use a heavy foundation. This one is perfect and with a little powder stays on throughout he day. I like how it feels like I don’t have foundation on at all, as it is so light and blends in so easily. It’s definitely a natural finish and I tend to use my fingers to apply it.

Uncovering-the-unloved_01

I purchased a magazine the other week which came with a free sample of Elemis’ ‘Softly Softly’ Daily moisturiser. My usual moisturiser is Oilatum’s daily repair and whenever I try another one out, I usually end up hating it. The Elemis moisturiser has such a different formulae than what I’m used to. As I have dry skin I usually look for a thick moisturiser, but this one is quite the opposite. It’s very light and smells strongly of Tea tree oil. I don’t like the scent, but luckily it doesn’t linger for long. It sits perfectly under my foundation, and I have noticed a massive improvement with my skin already.

I like how I have a mix of new products I am trying, samples and old favourites. I find this the easiest way to not forget about a product, as well as trying something new.

Does any one else store a selection of products away from their collection?

Guest Post: Five products I’m loving right now!

Posted by Lipglossiping On March - 26 - 2013

Hi, this is Marina here from Makeup4all guest blogging today, and I would like to tell you about five makeup products that I enjoy using right now.

First of all, you need a good canvas to start with, so Rouge Bunny Rouge Tinted Moisturizer is my current choice. I have a dry skin type and it’s not that easy to find a foundation/BB Cream/Tinted Moisturizer/ you name it that doesn’t enhance any dry patches and looks natural on me. And this “foundation” does wonders! It gives a beautiful radiant finish which looks like a second skin. As it is a tinted moisturizer, you get a light coverage which is, luckily, enough for me. I use the shade Adansonia.

makeup4all-products

Blush is probably my favourite makeup product and I can never have too many. My current favourite is BECCA’s Creme Blush in Amaryllis. It gives a very natural looking flush, blends into the skin beautifully and stays on for the whole day. I just can’t get enough of it. I have recently hit the pan on this baby which, considering how many blushers I have, says a lot!

I love wearing red lipstick from time to time and my current favourite has to be Lancome’s L’Absolu Rouge 160 Rouge Hypnose (It was a part of the brand’s Autumn collection but you can still get it, from Feel Unique for e.g). It goes on smoothly, gives an opaque coverage with one layer and doesn’t dry the lips out. The colour is to die for, plus I am very fond of the design, so chic!

makeup4all-swatches

As for the eye products, I’ve been very impressed with New CID cream eye shadows, i-colour. I have a shade called Chocolate Opal and it is a cool chocolate tone with silver shimmer. Light mousse texture allows you to get a very thin layer (or you can build it up if you wish), which doesn’t crease, smudge or fade for hours.

The last thing that I have to mention is Anastasia’s Lash Genius. For me this is a must-have, I actually got a second tube already! It is basically a top coat which makes your mascara waterproof. I have sensitive eyes that often water and this product is my saviour! The bonus is that it’s not hard to remove, as some waterproof mascaras.

And what about your current top five makeup products?

Adding New Textures to Your Make-Up

Posted by Lipglossiping On March - 31 - 2012
Hafsa Issa-Salwe is a 20-something International Business student from London.  She counts the feel of a good body lotion, the glitter of an eyeshadow and the smell of a Lush bath bomb as one of life’s little delights.  The following article is a guest submission, you can read more from Hafsa at Muslimah Beauty.


I have a tonne of make-up and even though I’m in possession of an unhealthy amount of it, it’s quite easy for me to get bored of it all so I love switching things up a little and experiment with what I already have than to buy something else.  Add a squirt of illuminator to your foundation and you’ll get a gorgeous slow, foundation plus blush equals cheek and lip tint, a dab of Vaseline to your bronzer and you’ve got a gel-like bronzer, mix an eye pigment with some water to create eyeliner and you can create a cream shadow with a hint of lotion.

Liquid Blush

Daniel Sandler was a genius when he created his infamous Watercolour Blush.  I’d never used a liquid blush before and I was quite sceptical to use one for fear of it just looking wrong once applied but, I was proven wrong and now I consider liquid blush and I the best of friends!

Powder blush can look too aging on a person, can highlight dry skin and is just downright boring at times whereas liquid and cream blushes make it seem like you’re glowing within and they’re the perfect texture for all you ladies with dry skin.

To mix up my own liquid blush I’ll squeeze a pea sized amount of moisturiser that’s not too thick and creamy as it’ll be quite hard to spread and blend otherwise. Once you’ve mixed the lotion and blush together, you’ve got yourself a very pigmented blush and it’ll set so it won’t budge for ages.

Gel Bronzer

When my beloved MAC Bronzing Powder crumbled to pieces on my holiday in Egypt, I was in the middle of Cairo without a clue of the nearest MAC so I just improvised and created myself a gel bronzer with the help of some Vaseline and the rest is history.

Depending on how dark you want to go, add less or more of the bronzer.  For general reference, it should always be two parts Vaseline to one part bronzer.  For added shimmer if your bronzer isn’t already shimmery, add a liquid illuminator like NARS’ Laguna and you’ll be glowing like you’ve spent two weeks in Barbados instead of grey old Britain!

Other ideas include:

~ Mixing together a little moisturiser, primer and foundation for a long lasting, matte/dewy (this’ll depend on the primer you’re using) for tinted moisturiser.

~ To get a great gel liner, Vaseline and black eyeshadow will do the trick.

~ Go crazy with spring’s colourful eyes trend and swirl together the brightest eyeshadow you have with the tiniest amount of water to make the shadows pop. I love this trick because it leaves the shadow super easy to blend, so this one is ideal for beginners.

~ For a nod to the S/S 2012 marine trend, mix gold glitter into loose silver eyeshadow and swoop across your lids for a gorgeous iridescent finish.

~ Lipbalms on top of lipsticks, and lipsticks on top of lipbalms! Or you could go arts and crafts by melting down a lip moisturiser with a little lipstick for your own homemade tinted lipbalm.

So girls, have fun with the contents of your cosmetics bag by playing with textures to get the most from your make up.

X

Hafsa from Muslimah Beauty

If you would like to submit a non-commercial post to be considered for inclusion on Lipglossiping.com, please email for more details.

Bourjois Khol & Contour Shadow and Light Pencils

Posted by Lipglossiping On March - 30 - 2012
Jen is from London and works in PR/Social Media.  She’s a bonafide beauty junkie with a self-confessed “mild” shopping problem!  The following article is a guest submission, you can read more from Jen at A Beauty Junkie in London.


Hello!  Jen from A beauty junkie in London here!  Whilst Charlotte is away on her holidays (not that I’m jealous at all) I’m doing a little guest post for you!

Here’s a little look at the new Khol & Contour Shadow and Light Pencils* from Bourjois.  These pencils each include a light and dark liner shade that compliment each other.  The light shade in each of the pencils has a metallic sheen to it whilst the darker one is matte.

IMG_6510
Bourjois Khol & Contour Shadow and Light Pencils
IMG_6516
Natural Light
IMG_6512
With Flash

Shade wise, the dark shades are all consistently pigmented and feel creamy when used.  Of all of them, the navy blue is the weakest in colour pay off.  The paler shades on the other hard really vary, of course as they are the paler shades the colour pay off naturally contrasts with the darker ones… but when looked at alongside each other the ‘dragee’ shade (the one with the blue) is a bit lame.  So overall, the marine/dragee shade is my least favourite.

I also found that the texture of the lighter shade was a little crumbly, with the tip of the pencil breaking off of when I went to swatch them – because of this I’d definitely swatch them before first use as you don’t’ really want it going in your eye.

The two stand out colour pairings are the khaki and the champagne gold and the brown and the ‘caramel’ purely on the strength of the pigment and how the colour combinations are safe and neutral – but still slightly more unusual. If I was to choose one, I’d go with the khaki/champagne!

* press samples

If you would like to submit a non-commercial post to be considered for inclusion on Lipglossiping.com, please email for more details.

…Featuring: Le Petit Jardin de Liloo

Posted by Lipglossiping On September - 2 - 2011

Ahh Liloo, mon petit chou-fleur (she likes it when I call her that).  I’m delighted to have this French-firecracker guest blogging for us today.  She’s the queen of Halloween, the high-priestess of Twitter and accelerates from nought to ‘passionate’ quicker that a Lamborghini super-charged Citroen. 

Today, she’s going to help us out with those pesky false lashes as she looks at the “8 reasons why you still can’t apply false lashes”.

So, grab a cup of tea, settle back, and read on as Lipglossiping.com features: LePetitJardindeLiloo

.

Bonjour, my name is Liloo and I am a recovering hopeless false lash wearer.  Throughout my life, I’ve been obsessed with many things: trying to find the perfect foundation which doesn’t break the bank, the best fake tan, achieving a dramatic cut crease… but nothing has possessed me as deeply as trying to apply false lashes.  I couldn’t tell you how many “how-to” youtube videos I’ve watched in frustration as the false lash appears to pop itself perfectly on the wearer’s upper lashline as if by voodoo!  How do they do it?  What am I doing wrong?

Patience is not one of my virtues, I’ve never been further than Green Hill on Sonic the Hedgehog and a scrambled Rubik’s Cube lasts about my 5 minutes before flying across the room.  But a few years on, I feel I’ve finally cracked it.  I feel I can now apply *some* false lashes confidently enough to seen in public.  But it’s been one heck of a tumultuous learning journey and I wanted to share some tips I have learnt along the way:

  1. Packet-ready: You expect the lash to fit straight from the packet

There is no way I would expect trousers I bought from the shop to fit my voluminous derriere and my short legs, without having to alter them.  Lashes are the same and I find myself having to trim the lashline on most lashes.  Make sure to measure the lashes before applying them and trim them accordingly, If in doubt, it’s better if they are too short, and you can always rely on some eyeliner to fake the little bit of lashline missing.  Went a bit mad with the scissors?  Again, not a problem as you can pretend they were corner lashes all along.  You bought full lashes and you want them to be noticeable but if they are sticking out too much on the outer corner, the eyelid will look heavy, as if it’s dragged down and the whole eye will look more closed off than before you started.  Placing it too close to the inner corner will bring a whole host of problems: 1) It will look unnatural, as your natural lashes only really start to be noticeable where the pupil starts, 2) you’ll struggle to make it stick without pinging out, 3) it will be very uncomfortable.

  1. Run: You want to run before you can walk

You want to make an impact and have chosen the most extravagant lashes to wear.  Dramatic, full fancy and elaborate lashes will need a thick lashline to support all the drama.  The more dramatic the lashes are, the thicker the lashline will be, and the more difficult they will be to apply and align just right on your lashline.  Don’t throw away your amazing lashes, keep them for later when you’ve gained a bit more confidence.  Aim to wear subtle effect lashes first and work your way up.

  1. Application Sequence: You apply false lashes after you’ve done your makeup.

This might be controversial but picture this: You’ve done the most amazing makeup ever. You’re so proud, you took 107 photos of it.  Are you really going to try 4 times to apply your false lashes, with glue all over the place and risking ruining your eyeshadow masterpiece?  No.  What you’ll end up doing is try to apply the lash just once and give up after that.  Why? Because while you removed the lash, the glue ripped some eyeshadow in the process, your perfect eyeliner smudged along the way.  You’re then left to try to fix your makeup, feeling worse off, wondering why you even bothered.

However, if you apply the lashes BEFORE any makeup, while you’re still trying to feet and learning, first you’ll have the best vision of your lashline and there will be no makeup to ruin. If there are pesky residues of glue in the process you won’t feel it so bad at trying to scrape it all off.  The obvious drawback is that the lash might have some eyeshadow fall out on it, so you’ll have to be extra careful at tapping the excess of eyeshadow beforehand.

  1. Cause it’s not you, it’s me

The lashes are rubbish, not you.  You bought lashes that are so poor quality, that even an experienced falsies wearer would not go near them because they don’t sit right.  The first pair of eyelashes I bought were NYC £1.99 lashes and a few years down the line, I now understand why I was struggling so much.  Once you take them out of their curvy support, the lash transforms itself into a straight fringe of hair. You’re forever trying to make it ‘marry’ the natural horizontal curve of your eye and whatever you do it’s pinging out, on the inside and outside corner of your eye.  Again, this might be a bit controversial, but even if you are beginner you need to invest in decent pair of eyelashes, it makes such a difference.  No need to spend a fortune, but aim to spend minimum of £5 and go and spend your pennies in a brand who specialises in lashes, like Eylure or Ardell if you’re outside England.  Unfortunately, there is no way of knowing before removing the lash from support if they’re going to all straight or retain their curvy shape, so you’ll have to rely on recommendations from people you trust.  Yes, I am sure you can find decent £1 lashes, but as a beginner you need all the help you can get and you need to the lash to do some of the work for you.

  1. Time

You’re not giving yourself enough time.  Not time in general (I gave myself years) but time on that day/evening before that special occasion where you want to wear your fluttery and dreamy lashes.  How long?  If you spend one hour to dry and style your hair, give yourself also 1 hour (you will inevitably be distracted) to apply your lashes, and aim to reduce progressively that as you grow more confident.  Eyelashes can make such a dramatic impact, I feel it’s totally worth spending the time.  If you like to include a little bit of spirit in your getting ready routine, I find it helps not to finish the bottle of vodka before applying my lashes.

  1. It’s not sticking properly

Not all glues are created equal.  Most glues which come with lashes are not very good, so stick to reputable brands such as Duo, Eylure and Ardell, which are totally resealable.  I’ve been wearing lashes for years, but I always like to carry a little bit of glue, in case. Call it my comfort blanket.

  1. Sit and Wait: Your timing is not right

There is nothing more irritating than following instructions to the letter and not getting it right.  You’ve counted 30 (Mississippi) seconds, you’re reading to tame the beast and introduce them to your lashline and it’s not working.  Apply the lash too soon, the glue will be too wet and the lash will end up everywhere but not on your lashline.  Wait too long, the glue is too dry, it will either not stick at all or you’ll be left with just one chance to get it perfect with no room to reposition it.  The best moment is when the glue is tacky.  “Tacky” is when the glue becomes almost transparent and when you touch it and it does small strings similar to melted cheese on a pizza, when you cut off a slice and the cheese trying to come off with it.

  1. Elp! You’re not using all the help available

Kids will start learning to ride a bike with stabilizers attached.  You can do the same for lashes.  Experienced false lash wearers will use a normal pair of tweezers or just their hand.  What if they made giant tweezers the same size as your lashline?  They do and it’s simply called a ‘false lash applicator’.  I found my stabilizers years ago from Japonesque, the best £7 I’ve ever spent.  Using the eyelash applicator made all the difference and, it was only then that I felt I had finally cracked it.  I am actually getting a little bit emotional reminiscing how happy it made me.  I can feel pretty now!

My lashes are so short, so straight.  Wearing false lashes gives me such a boost that it has become what I like the most about ‘makeup’.  The secret recipe for false application?  You’ve probably found it already, not very well hidden at the beginning of each paragraph 😉  When you’ve found it, do it, do it and do it again, like there’s no tomorrow.

You think you’ve ruined the lash after not getting it right for the first time? The lash can take it, it’s meant to be used and used and used again.  If the lash looks a bit bruised, that’s fine – it will help make it look more natural.  Keep at it, don’t give up, the rewards are worth it, I promise.

Happy false lashing xx

.

Thanks Liloo!  I’m gonna get some more practice in!  You’ve enabled that Japonesque lash placement tool straight into my shopping bag, looking forward to trying it!  False lashes were the one thing I wished I’d had the confidence to use when I went to that wedding last month.  I will get it eventually!

…Featuring: Eyeliner & Spraypaint

Posted by Lipglossiping On September - 1 - 2011

Robyn has been one of my weekly reads for many, many months.  The only blogger in existence who makes me want to wear yellow eyeshadow.  She makes me laugh, and she makes me want to grab my makeup and play.  It’s a killer combination.

I’m delighted to have her guest blogging an awesome and autumnal-inspired tutorial for us today.  Read on as Lipglossiping.com features:  EyelinerAndSpraypaint

Hello, lovely Lipglossiping readers! I’m thrilled to be writing a guest post for you all, so I thought I’d knock together a little picture tutorial for this purple, chocolate and brown look.  I don’t always follow that you should use colours according to season, but this would be perfect for fall and it’d be very easy to switch up the colours in this look if you’d prefer something less smoky.

1. Prime your eyelids. I’ve used Urban Decay Primer potion all over the lid and then NYX Jumbo Eye Pencil in Milk sparingly over that, bringing it slightly up past my crease and blending well. Too much base in the crease area can grab your shadow and make it hard to blend.

2. Apply a bright white-gold on the inner third of your lid, and bring it into the inner corner of your eye.

3. On the rest of your lid, add a matte chocolate colour…

4. …and blend it in with the gold to get rid of that harsh edge. Using a flat shader brush, hold it vertically and make side-to-side motions. Add more of the gold if you need to.

5. Next, take a deep, slightly plummy matte purple and start to define your crease. Using a fluffy brush, I placed the shadow under the highest point of my brow and made small windshield-wiper motions. Go slowly and build up the colour – you can always add more but you can’t take it away without taking it off – and make sure you place your brush on the same spot on each eye to make it even. Repeat until you’ve got your desired depth of colour.

6. Then, using windshield-wiper motions again, blend the crease colour down toward the inner corner of your eye. Make this a little less intense than in step 5 so there’s a slight gradient.

7. Taking the same purple on a pencil brush, line your lower lashline, making sure to join it up with the crease colour.

8. Taking a deeper brown on an angled brush, line your upper lashline, the outer half of your lower lashline and darken the outer crease slightly with the same colour using a fluffy brush. You could  use a black shadow if you wanted a more dramatic effect.

9. Line your waterline with a black (or deep brown) pencil and tightline your upper lashes if you want. If your liner tends not to last very well on your waterline, set it with a touch of matte black (or brown) shadow.

10. Taking a fluffy paddle brush, highlight under your brow and blend any harsh edges in your crease colour and your outer corner. I chose a matte cream shadow, but if you want more drama or sparkle, you could go in lightly with the same shimmery gold we used earlier.

11. Add mascara and brows (and falsies if you want!) and your eyes are done!  Hooray!

Products used:

Eyes: Gold – Mornings of Gold by Hi Fi Cosmetics. Chocolate brown, Inglot matte 357. Purple from Wet & Wild Lust palette. Deeper brown, Inglot Matte 326. Liner, Benefit Bad Gal waterproof liner in Black, set with Sleek black eyeshadow. Highlight, Inglot matte 351. Mascara, Maybelline One By One. Eyebrow pencil, Rimmel Professional Eyebrow Pencil in Hazel.

Lips: Nameless L.E Barry M Lipgloss Wand

Face: Inglot Cream Foundation in 21, Darling Girl blush in Aloha

.

To finish the look, I added a soft matte bronzer and a pinky-nude gloss. I hope you ladies enjoyed the tutorial, please let me know how you got on if you try it out!


Thanks Robyn! It looks lovely and you know, they say that purple suits EVERY skintone and eye colour. The ultimate universal shade!

…Featuring: Beauty’s Bad Habit

Posted by Lipglossiping On August - 30 - 2011

Lily is a 19 year old beauty blogger hailing from one of my favourite UK cities, Manchester.  She has a penchant for indie cosmetics, inspiring looks and creating inventive ways to store your makeup!

Since first stumbling across Lily’s blog, I’ve been transfixed by her tutorials – she has the kind of creativity I could only dream of aspiring to.  Don’t believe me?  Read on as Lipglossiping.com features:  BeautysBadHabit

.

Take some black eyeliner, a leopard and an electric guitar, blend them together and what do you get? A freakin’ rock ‘n’ roll smokey eye, that’s what!  Or a really big mess…try explaining that one away to your insurance company.

1. Apply your eyeshadow primer as usual.  Cover your entire lid with a soft, black eyeliner and blend upwards just a tiny bit past the crease.  Don’t worry if it’s patchy, it will be covered up soon!

2. Pat a deep, shimmery eyeshadow over the black.  You can use any colour you fancy, purples and golden browns look great with this look, too.

3. Now apply a matte highlight colour downwards from directly beneath the eyebrow.  Applying the highlight colour first makes it easier to blend past the crease in the next step…

4. Use the same deep, shimmery colour on the lid to extend the eyeshadow shape upwards past the crease.  If you’re unsure of how to shape your eyeshadow, use your eyebrow shape as a guide.  If you don’t want to add leopard print to your look, skip to step seven.

5. Squiggle some pale coloured dots, dashes and ‘C’ shapes above your crease.  Apply more at the outer edge and use fewer as you near the centre of your face.  I’ve used eyeshadow mixing with Illamasqua sealing gel, but coloured liquid eyeliners are definitely an easier option!

6. Outline your dots and dashes at the outer edges. You don’t have to be neat or even – how uniform are a leopards spots, after all?!

7. Extend the eyeshadow all the way around the eye.  Apply eyeliner to the waterline – I used a white and pressed the same pale blue eyeshadow I used for the dots over the top.  You could always use the usual black, though!


8. Apply mascara or false lashes and fill in your eyebrows.  If you decide to use falsies, opt for ones which aren’t very long, otherwise they will cover your leopard design up!

9. Bask in the glory of your awesome eye makeup 🙂

I finished off this look with peachy pink blush and a pink toned nude lipstick for a balanced and fresh finish. I’m not listing the exact products I used throughout since they’re not especially unique, you can pick up similar shades from any make-up company!

.

See what I mean about the talent?  Fiendishly awesome, thanks Lily!!

…Featuring The 6 Inch Stilettos

Posted by Lipglossiping On August - 29 - 2011

Amrita is a doll, her bubbly and infectious sense of humour keeps me smiling on Twitter, whilst her impeccable taste in cosmetics often has me lusting after her most recent acquisitions!  Not sure?  Check out her storage post for a sneak peek at her ‘cheek’ drawer!

I’m thrilled that she agreed to guest blog for us today, so without further ado, read on as Lipglossiping.com features: The6InchStilettos

.

Seeing as my Top 10 series has been so popular, I figured that I should do a Top 10 feature on my makeup brushes too. Now, I own a hell of a lot of makeup brushes and although some of them are unloved, I try to rotate them and use them at least once or twice.

A lot of conversations on Twitter amongst beauty bloggers and general girly chit chat revolves around makeup brushes and which ones are the best to buy but it always comes down to personal preference. Some like firm brushes while others prefer super soft ones, others think that expensive brushes are best while others feel that high street versions are way better – It’s all personal.

Anyway, I’m waffling on way too much so let’s get cracking!

These are my most used and most loved makeup brushes…

Unknowingly, it turns out that I have 5 main face brushes and 5 main eye brushes which I definitely didn’t plan but I guess it all works out in the end.

So, the face brushes…

From left to right:
Bobbi Brown Blush Brush
Bobbi Brown Powder Brush
Crown Brush Stippling Brush
Crown Brush Flat Top Kabuki Brush
Inika Cosmetics Kabuki Brush

Now, the eye brushes…


From left to right:
Bobbi Brown Eye Blender Brush – Very similar to MAC 224 but with longer bristles
Inglot 6SS Blending Brush – Another one that is very similar to MAC 224 but slightly wider
Bobbi Brown Ultra Fine Eye Liner Brush
Boots Eyeshadow Brush – Probably my favourite eye makeup brush EVER
Crown Brush Eyeshadow Brush

I have loads of Bobbi Brown makeup brushes in my collection purely because I used to work for them but even if I hadn’t, I definitely would have invested the money. They don’t shed and they’re made so well that you can’t go wrong with them – Plus, each brush is already labelled so even someone with no existing knowledge of makeup brushes can use them with ease.

Other brands of makeup brushes that I use include: MAC, Royal & Langnickel, The Body Shop and Essence of Beauty. The next brushes on my list are Sigma makeup brushes so I might have to wait until pay day to splash out on a full set of those!

What are your favourite makeup brushes or the ones that never let you down?

Make sure you drop a comment in the box or whizz over to my blog and let me know over there!

Until next time…
Keep swivelling those hips in your


Thanks Amrita!  I need to check out some of those Bobbi Brown brushes for sure!

Guest Post: Why has cosmetic surgery become so widely accepted?

Posted by Lipglossiping On February - 5 - 2011

Isabella has been beauty blogging since she was a student at University, writing for cosmeticsurgeryguru.com she now takes an interest in all cosmetic surgery procedures from surgical to non-surgical.

.

Why has cosmetic surgery become so widely accepted?

Most of us can remember a time when cosmetic surgery was a pretty taboo subject, not only in the world of celebrity and entertainment, but also on Civvy Street. Women who’d gone under the knife were often subject to endless questions over what they’d done – so it’s hardly surprising that few ever stuck their heads above the parapet to admit to surgery. Meanwhile, the mere thought that a man could have had a little nip-tuck would be a source of endless ridicule that could almost derail a career.

And if you think this only occurred in Hollywood in the 1980s and 1990s, think again. You only need to think back to the media furore over Men Behaving Badly actress Leslie Ash’s botched lip implants and the ‘trout pout’ jibes that followed in 2003 to realise how recently cosmetic surgery was deemed unacceptable and ripe for ridicule.

However, as we make our way into a new decade, a sea change in attitudes toward plastic surgery has become more and more noticeable. Having a little nip-tuck is nothing to be ashamed of any more – and is often celebrated in TV shows and magazines. As with many changes in society in recent years, there’s not one central reason for this – rather a combination of factors.

For a start, celebrities are much more comfortable discussing their procedures in interviews – and the public can often identify with the reasons they give. For example, TV presenter Jenny Powell recently admitted to having breast implants after years of breastfeeding left her boobs saggy and tired-looking – a situation millions of mothers could easily identify with.

And it’s not only women who are happy to discuss their treatments. More and more male celebrities are not only having surgery such as facelifts and hair implants, but are also promoting the clinics that have carried out the work. Where once famous men who had cosmetic surgery were considered a bit odd or vain, now even respected celebrities such as Gordon Ramsey and Duncan Bannatyne are widely reported to have gone under the knife.

However, it’s not only the celebrity world where it’s become increasingly acceptable to have plastic surgery. With more and more affordable treatments available, from non-surgical Botox to CACI facial toning, many procedures are now within the reach of everyday Britons too. And just as men in the celebrity world are turning to treatments, Joe Bloggs is also getting in on the act. Recent figures released by the British Association of Aesthetic Plastic Surgeons showed that demand for surgery among men soared by 21 per cent in 2010 – with operations to cure the dreaded ‘moobs’ (man boobs) rising by an amazing 80 per cent.

With the effects of the recession not only affecting our wallets but also giving many of us tired complexions, wrinkles and crow’s feet, it’s clear that the nation is waking up to the fact that there’s no longer any shame in giving Mother Nature a little helping hand and winding back the clock a little. And long may it continue!

.

Thanks for such an insightful and though-provoking guest post Isabella!  If you’d like to read more of Isabella’s thoughts on Cosmetic Surgery, be sure to stop by her blog: http://www.cosmeticsurgeryguru.com/

What are your thoughts on society’s acceptance of cosmetic surgery, do you believe there’s still a social stigma attached to surgical procedures?

Lipglossiping guest blogs for Simple!

Posted by Lipglossiping On November - 3 - 2010

Last month, Simple asked me if I fancied penning October’s guest blog for them and I jumped at the chance to feature on the site of a brand that to all intents and purposes, I grew up with!

They were curious about what life was like for a beauty blogger who doesn’t really have enough hours in the day to get away with such frivolity and I was more than happy to tell them.  After all, once I start… you’ll struggle to shut me up!

I recently sat on their judging panel to help decide who would become their new online brand ambassador, or “Simple Star” as she will be known.  It was both incredibly interesting and a real privilege to watch the impact that social media is having on a big beauty brand first hand.

I’ll be doing a little write up of the day shortly (I’m waiting on photos), but until then… you can read my guest blog by clicking here.

Liz Earle guest blogs…

Posted by Lipglossiping On June - 16 - 2010

I’m very excited!  We’ve only bloomin’ got Liz Earle guest blogging on Lipglossiping today innit!

It’s an exciting week for everyone at Liz Earle who are currently celebrating the 15th anniversary of their multi-award winning Cleanse & Polish Hot Cloth Cleanser.

Liz agreed to share her tips on how to save some pennies and treat ourselves to a well-deserved uber facial whilst in the comfort of our own pig stys homes.  Read on for her fabulous how-to…

Dear Lipglossiping Friends,

It’s lovely to share with you my personal tips on how to pamper your skin in the comfort of your own home! Plus, if you are looking to curb the expense of a full salon treatment, this technique could be for you.

As summer is approaching, this at home facial is exactly what your skin needs – a fresh, new beginning! Simple, fuss- free and pampering, this facial will leave you with a complexion ready for summer.

Here are the quick and easy steps of what to do:

~ Cleanse
~ Exfoliate
~ Steam
~ Extracts (if any)
~ Tone
~ Mask and rest
~ Moisturise

Cleanse

The cornerstone of fabulous looking skin is cleansing.  Cleansing is integral to achieve a clear complexion by getting rid of daily grime and impurities to keep your skin clean and prevent blemishes.  Look for a gentle cleanser that is free from mineral oil, has a rich and creamy texture and swiftly removes all traces of face and eye make-up.

Apply a small amount of your cleanser of choice to the fingertips of one hand and dot on forehead, cheeks, chin and neck.  Massage the cleanser into your skin in small circular movements – always work down the neck, and up from jaw line to your forehead, going outwards from the centre of the face.  Work around the nostrils to help shift blackheads, especially if you’re spot-prone.

Wash off the cleanser using a pure muslin cloth wrung out in warm water to help gently dislodge dead skin cells and help reveal clean, soft and radiant skin.  Finish by splashing your face with cold water for a final refresh.

Exfoliate

Exfoliating is a vital step to buff away dead skin cells and impurities, in order to reveal fresh radiant skin.  To give yourself the equivalent of a salon treatment at home, you can use a very gentle face exfoliator.  Look for one containing spherical beads such as jojoba and avoid anything with jagged particles such as nut kernels.

Gently massage your exfoliator over your face, neck and décolleté, for one to three minutes, using the whole length of your fingers and working in little circles, out from the centre.  Avoid your eye area.

Rinse off with warm water.  To remove any last traces, sprinkle toner on cotton-wool pads and sweep them over your face.

Steam

After you have prepped your skin by cleansing and exfoliating, start the steaming process!  Avoid this step, however, if you have very high colour on your cheeks, or rosacea.  You can buy fancy gadgets for the steaming process but I get the best results by steaming my face over a basin of hot water for five minutes.   Here’s how you do it:

~ Fill a bowl with just-boiled water and allow it to cool for a minute or two.

~ Tie back your hair, or use a soft stretchy hair band.

~ You can get skin softened and prepped from plain steam, with nothing added to the water, although adding a few drops of essential oil will help blemish or spot-prone skin.  All pure essential oils are volatile oil compounds and therefore have antiseptic and antibacterial properties.  My favorites for facial steaming are lavender (good for all skin types), rosemary (for oilier skin) and tea tree (highly antibacterial and thus excellent for helping to purify spots and breakouts).  Add three to four drops to the water just before you put your face over it, and swoosh round with a toothbrush handle or similar.  Essential oils are broken down by heat, so drop in at the last moment to retain maximum potency and aroma.

~ With the towel over your head, take six deep slow breaths (through your mouth may be more comfortable). Move your head a little so every part of your face benefits from the cleansing steam.

~ Remove the towel after about five minutes and use it to pat the skin dry.

Extracts

The easiest time to remove any small spots or blackheads is just after steaming when skin is softer.  Apply a small dab of plant oil (i.e. grapeseed or almond) or balm to the affected area.

Wrap both index fingers in a tissue (pull it in half, so you have two thin sheets) and gently press the blemish to unclog the plugs of sebum.  Wipe clean and follow with a sweep of skin tonic.  If the spot is deep, don’t push or poke too hard; it may not be ready to be extracted.

A good tip: good light is essential and if you don’t have 20/20 vision, a magnifying mirror is very useful.

Tone

A toner is essential for closing pores and preparing your skin for your favorite moisturiser, so follow extractions with a sweep of skin toner sprinkled onto a cotton wool pad to cool the skin.  This will help to keep your complexion cool and calm.  Look for an alcohol free toner that will not dry or irritate your skin.

Mask & Rest

Some women don’t usually use a mask, but I believe it’s an essential part of the process to leave skin balanced, calm and clear.  Apply a generous layer of your favorite mask to both face and neck, but avoid the immediate eye area.  Clay-based masks are useful for spot-prone congested skin.  If you have dry skin I recommend using a creamy, oil-based mask as these are more nourishing.

It’s fine to mix and match masks and use a clay-based mask on your T-zone and then a richer, hydrating formula on drier cheeks.  Apply with your fingertips or – a little insider secret – use a blusher brush to paint the mask over your face!

To help you fall into a haven of rest and wake up with eyes that sparkle, dampen two cotton wool pads with an eye lotion.  Look for one that’s gentle, soothing and will revitalize your delicate eye area.  If you have the time, chill the pads in an ice tray for 10 minutes before applying for a refreshing treat.

I encourage you to lie down for 15 to 20 minutes with your feet propped up – raising your ankles above the level of your heart helps circulation.  Once you start feeling re-freshed, remove the eye pads and thoroughly wipe away the mask with a damp muslin cloth, flannel or facial sponge.

Moisturise

Finish your pampering treat by applying a moisturiser.  Dot over your face, neck and décolleté before massaging in.

I recommend you look for a moisturiser containing natural plant oils which will work in harmony with your skin’s natural oils to give it just the right amount of moisturisation, leaving your skin radiant with a healthy-looking glow.

Follow with your selected eye cream.

I hope you’ve found my personal tips helpful and just in time for summer.  If you have any questions regarding this at-home facial treatment, please feel free to ask any questions to Charlotte and the Liz Earle team and I will be happy to answer them.

Best regards,

Liz

So there you have it, tips from a bonafide skincare queen!  I’m going to give it a go this weekend, I’m in need of some serious pampering and have my Instant Boost Skin Tonic and Deep Cleansing Mask at the ready!

I never get round to making time to do this kind of thing despite ALWAYS promising myself that I will, so I’m pledging…. right here, right now.  Next week, my skin will GLOW from a proper DIY facial thanks to these tips.  Anyone else gonna make the pledge with me?  And no cheating… you have to do the lot… the steaming and the feet up bit included!

Also, as Liz mentioned… if you have any questions about DIY pampering, please leave a comment below!

RANDOM

The Lipstick League – week of 26.8.13

I’m very excited!  We’ve only bloomin’ got Liz Earle guest blogging on Lipglossiping today innit! It’s an exciting week for everyone at Liz Earle who …

Avon - Free Delivery Today Only

I’m very excited!  We’ve only bloomin’ got Liz Earle guest blogging on Lipglossiping today innit! It’s an exciting week for everyone at Liz Earle who …

New for Spring! Clarins Joli Rouge Brilliant Sheer Shine Lipsticks in Tropical Pink & Coral Tulip (Photo Heavy)

I’m very excited!  We’ve only bloomin’ got Liz Earle guest blogging on Lipglossiping today innit! It’s an exciting week for everyone at Liz Earle who …

Personalised Guerlain "Ma Petite Robe Noire" (just in time for Xmas)

I’m very excited!  We’ve only bloomin’ got Liz Earle guest blogging on Lipglossiping today innit! It’s an exciting week for everyone at Liz Earle who …

Beauty Blog Link Love - Monday 28th February

I’m very excited!  We’ve only bloomin’ got Liz Earle guest blogging on Lipglossiping today innit! It’s an exciting week for everyone at Liz Earle who …

Swatch Saturday: NARS Ashes to Ashes

I’m very excited!  We’ve only bloomin’ got Liz Earle guest blogging on Lipglossiping today innit! It’s an exciting week for everyone at Liz Earle who …

The Body Shop Lightening Touch Universal Radiance

I’m very excited!  We’ve only bloomin’ got Liz Earle guest blogging on Lipglossiping today innit! It’s an exciting week for everyone at Liz Earle who …

MAC Lightscapade Mineralize Skinfinish

I’m very excited!  We’ve only bloomin’ got Liz Earle guest blogging on Lipglossiping today innit! It’s an exciting week for everyone at Liz Earle who …

The Lipstick League – Week of 25/6/2012

I’m very excited!  We’ve only bloomin’ got Liz Earle guest blogging on Lipglossiping today innit! It’s an exciting week for everyone at Liz Earle who …

Batiste for Brunettes!

I’m very excited!  We’ve only bloomin’ got Liz Earle guest blogging on Lipglossiping today innit! It’s an exciting week for everyone at Liz Earle who …

POPULAR

CLOSED: Competition Time: Givenchy Very Irresistible L'eau en Rose Perfume!

I’m very excited!  We’ve only bloomin’ got Liz Earle guest blogging on Lipglossiping today innit! It’s an exciting week for everyone at Liz Earle who …

CLOSED - Win it! The Body Shop Expert Brush Collection

I’m very excited!  We’ve only bloomin’ got Liz Earle guest blogging on Lipglossiping today innit! It’s an exciting week for everyone at Liz Earle who …

Win a gorgeous "glow" trio with prizes from Urban Decay, New CID, & Arbonne!

I’m very excited!  We’ve only bloomin’ got Liz Earle guest blogging on Lipglossiping today innit! It’s an exciting week for everyone at Liz Earle who …

Hello? Is this thing on?

I’m very excited!  We’ve only bloomin’ got Liz Earle guest blogging on Lipglossiping today innit! It’s an exciting week for everyone at Liz Earle who …

Avoid the brush off with Oral-B Pro-Expert

I’m very excited!  We’ve only bloomin’ got Liz Earle guest blogging on Lipglossiping today innit! It’s an exciting week for everyone at Liz Earle who …

Big savings on French Pharmacy brands, win my Escentual.com top picks!

I’m very excited!  We’ve only bloomin’ got Liz Earle guest blogging on Lipglossiping today innit! It’s an exciting week for everyone at Liz Earle who …

Win it! 3 EcoTools Bamboo Bronzer Brushes to win!

I’m very excited!  We’ve only bloomin’ got Liz Earle guest blogging on Lipglossiping today innit! It’s an exciting week for everyone at Liz Earle who …

FOTD Busting out of the comfort zone!

I’m very excited!  We’ve only bloomin’ got Liz Earle guest blogging on Lipglossiping today innit! It’s an exciting week for everyone at Liz Earle who …

Dear Obesity...

I’m very excited!  We’ve only bloomin’ got Liz Earle guest blogging on Lipglossiping today innit! It’s an exciting week for everyone at Liz Earle who …

Urban Decay The Black Palette - Photos & Swatches

I’m very excited!  We’ve only bloomin’ got Liz Earle guest blogging on Lipglossiping today innit! It’s an exciting week for everyone at Liz Earle who …

COMMENTS

  • Categories

  • Archives

  • Admin

  • Ads