Josh Wood Blending Wand in Dark Brown

Posted by Lipglossiping On April - 1 - 2014

When trying a beauty product for the first time, I try to remain open-minded.  When a product has been hyped by the beauty community, it’s easy to have certain far-reaching expectations the first time you try it.

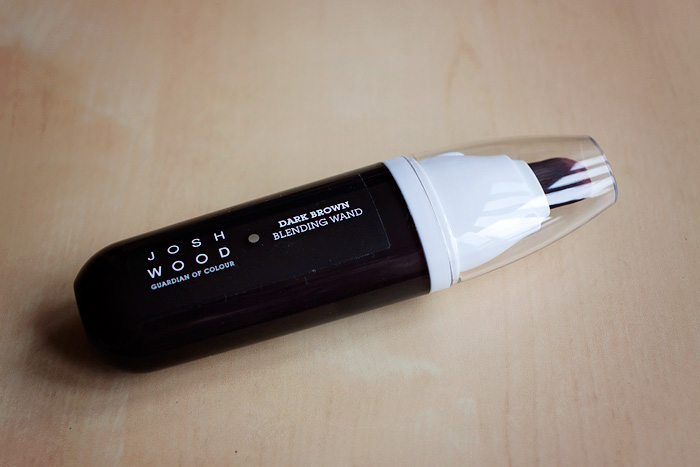
However, in the case of the new Josh Wood Blending Wand*, my expectations were lower than low.

Reviews for this product, which is sold exclusively at Marks & Spencer are generally pretty dire on the M&S website, frighteningly so to be honest.  I try to avoid reviews before approaching a product that I’m going to blog about but I was frankly unsure about the best methods for applying the goop inside the wand (the instructions aren’t in plain sight), and so I found myself Googling in advance.

IMG_4949

Before I get down to the nitty-gritty, let me explain what – in my opinion – this product from acclaimed colourist Josh Wood is, and perhaps more importantly… isn’t.

The Josh Wood Blending Wand is a temporary solution to a common problem.  The problem being visible roots between hair colouring.  Perhaps you go to a salon for a professional experience every couple of months, or perhaps you box-dye it at home.  Either way, you’ll be familliar with the annoying inbetween stage… inbetween salon appointments, or inbetween finding time to redo your roots at home.

What it isn’t however, is a replacement for a regular hair-dye.  This also isn’t a replacement for a permanent root touch-up kit.  In my novice experience, it takes less than 15-minutes from start to finish to turn the unsightly into the respectable when it comes to your hairline.

IMG_4951

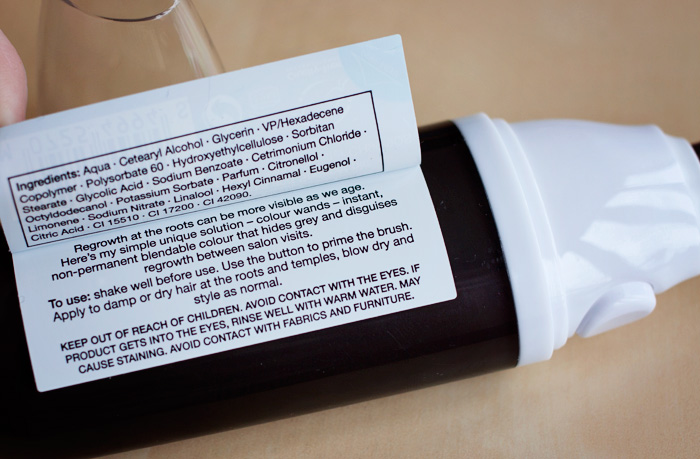
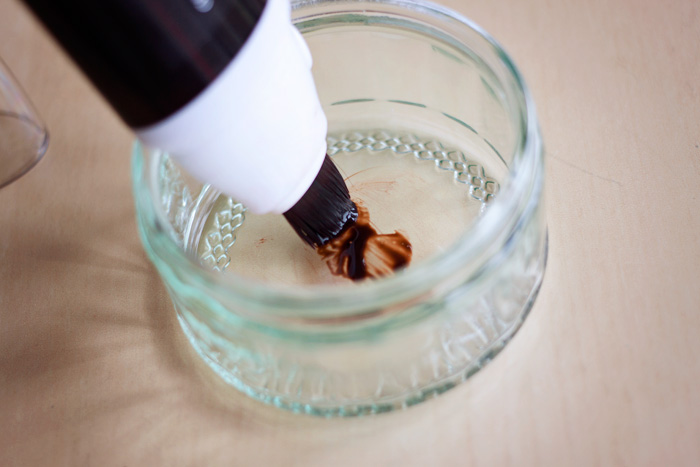
The somewhat limited instructions are located under the label on the back of the wand.  It makes the application process sound a little less involved than it actually is.  First things first, I absolutely recommend that you don’t try to use the Blending Wand without a little mixing bowl to hand.  The “goop” inside literally drips out when you prime the product and you risk making a mess unless you dispense into a bowl first.

IMG_4953

IMG_4986

I applied the Josh Wood Blending Wand directly onto dry hair.  Let’s be honest… if I wanted to faff around with wetting my hair first, I’d just go down the root touch-up kit.  I wanted something that I could use during those emergency moments of god-awful clarity when you catch sight of yourself in the mirror whilst getting ready to go out.  If it couldn’t fulfil that role… I wasn’t particularly interested.

To use, I pumped the button on the side of the wand a couple of times to prime it.  This allows the product to dispense into the brush… or more conveniently, into the bowl you’ve sourced.  Load the brush with the colour and gently apply the product to your roots.

For me, the key to achieving a good finish without making my hair sticky, or staining my scalp is to use a light hand.  You don’t need half a gallon of product on the brush for it to be effective.  Use a little at a time and don’t be afraid to work the brush across the “grain” of your hair aswell as in the root-to-tip direction.  Doing this with an almost-dry brush and working it through the strands cross-ways works well for me.

At this point, your roots should be damp but not saturated.  If you use too much product, you’re going to be left with a sticky-residue once you’ve blow-dried.  The product will not magically disappear into the ether just because you’ve blasted it with a hairdryer.  Use a light hand and apply more if needed.  I also recommend using your fingers to lightly distribute the product across your roots whilst drying, in a similar way to rubbing in dry shampoo.  Remember to wash your hands immediately afterward to avoid stained fingertips.

Untitled-1

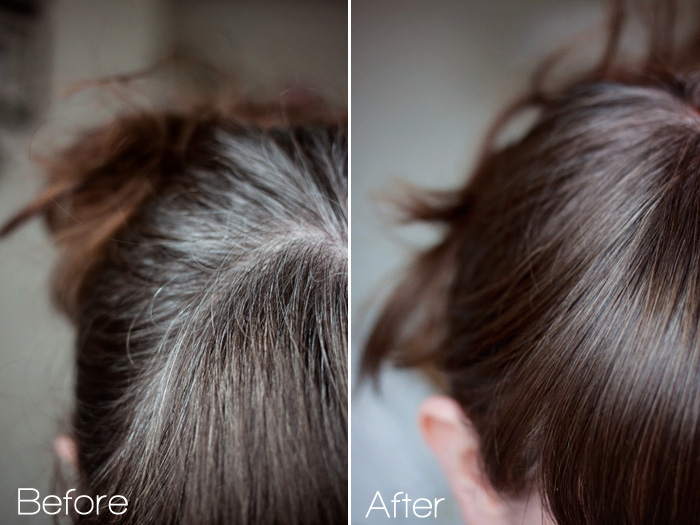
Because of my preconceptions after reading the reviews, I can’t quite put into words how impressed (relieved?) I was when I saw the results.  The colour blended well with my own and I only had a tiny bit of scalp staining where I’d been too heavy-handed at the temple.  My hair did feel heavier after application, especially around the fringe but it wasn’t sticky and didn’t need immediate washing, though I did wash it before bed that night as I was worried about staining my pillowcase.  The results have lasted well after two hair-washes, I don’t expect it to last much more than three or four at a push.

All in all, as a quick-fix solution for disguising roots in under 15-minutes, I can’t fault it.  If you try it and don’t get the results you were hoping for, take a look at your application method because you might need to adjust the quantity of product you’re using.  Considering just how bad my roots were, I really didn’t need to use a lot of product to get my finished result.  I should get many, many more uses from this magic little Blending Wand.

The Josh Wood Blending Wand, priced at £12.50, comes in 4 shades and is available exclusively instore and online from Marks and Spencer.

* press sample

if you liked this post, please don’t forget to check out my subscriber options, here


New Launch: Hair Chalks from Fudge Urban

Posted by Lipglossiping On July - 3 - 2013

Hair chalks have been steadily gaining in popularity for over a year now… these little sticks o’ colour offer the kind of hair eccentricity that many of us lust after without any of the regrets a trip to the hairdresser might bring!

If you’re new to the idea, the premise for creating some temporary colour effects is pretty simple…

1. Take your freshly styled hair and ready yourself with the colours you want to use.

2. Grab a towel and wrap it around your shoulders to protect your clothes from any fall-out.

3. If your hair is blonde, you may be able to use the chalks on dry hair… if you’re a brunette or red-head, you may need to wet your hair prior to applying.  This will increase the intensity of the colour but may also cause it to temporarily stain the hair shaft.

4. Starting at the tips and working toward the root, massage the chalk into your hair with your fingers.  Some advocate twisting the strands of hair as this increases the texture and grippiness for the chalk to adhere properly.

5. If you want an ombre effect, gradually apply less chalk as you work your way up the hair strand.

6. Seal the colour in (for around 24hrs) with a shot of hair spray.

fudge-urban-hair-chalks

In the UK, outside of Groupon and the like, this is the first time I’ve seen them go mainstream and the brand bringing them to the table (helpfully in pots rather than messy stick form!) are Fudge Urban.  The hair chalks will be going live (after having been road-tested last weekend at Glastonbury!) with five colours later this week: Festival Pink, Electrik Blue, Pumped-Up Purple, Red Hot Pepper and Iced White.

Still not sure?  Here’s a great video demonstration of how to apply hair chalks (note: these aren’t the Fudge Urban ones in use and skip to about 3mins 50secs to see the demonstration!)

Priced at £5.99 each, they’ll be available instore and online from superdrug.com… do get in touch with @fudgeurban on Twitter if you have any questions.

I foresee a lot more colour on the high-street next week… will you be trying them?

The accidental redhead

Posted by Lipglossiping On June - 6 - 2012

I know what you’re thinking… “Charlotte, don’t be stupid – you don’t just “accidentally” dye your hair”.  But allow me to explain, because it’s not as black and white (and red) as it may initially seem.

You remember that time when you accidentally ate someone else’s Krispy Kreme because you weren’t paying attention?  Or that time you innocently forgot to take your pill and had a baby as a result?  There are all kinds of accidents, it’s just that some of them aren’t completley blame-less.

I didn’t mean to wake up this morning with bright red hair that leans menacingly toward the cerise, but I’ll admit that it didn’t just ‘happen’ either.  It went something like this…

I bought a bottle of Crazy Color semi-permanent hair color cream online from Amazon… after umm-ing and ahh-ing over the shades, I went for #56 Fire mainly because the reviews of some of the other reds in the range were pretty poor.  I bought the Renbow Crazy Color because I was looking for something to refresh my recently dyed hair without causing further damage.  The Renbow Crazy Color range works by staining the hair shaft without opening the cuticle and penetrating into the hair, it’s a vegetable dye that doesn’t inflict damage in the same way as conventional dyes.

In order to refresh my locks and give them a little boost of colour, I intended to mix a little dye into my conditioner and let it sit for a couple of minutes before rinsing out.  Easy peasy!  Except, it didn’t quite work out like that.

Once I’d blow dried my hair, I could see that the dye had really taken to my lighter roots, creating an uneven halo effect.  Not only that but thanks to my cackhanded application, only the very top layer had grabbed the colour.  I tried to live with it for a couple of hours… but I couldn’t kid myself, I looked ridiculous.

So I went for it.

Ignoring the instructions, I applied 3/4 of the bottle to my dry hair and concentrated on ensuring that I was evenly distributing the product throughout.  I can’t lie to you, it was messy.  At one point, Paul commented that it looked like he’d been trying to murder me.  I knew from reading reviews that vegetable dyes are notorious for staining skin and bathrooms but I don’t mind admitting that I got to the point where I didn’t care!

Once I was satisfied that every strand had been covered (and combed through for extra insurance), I set to work on the cleanup.  I’d been wearing disposable gloves… an absolute must, trust me.  The rest of the cleanup was surprisingly easy – the sink was treated to a hefty dose of Cillit Bang and any ‘staining’ wiped off without any bother.  As for my skin?  I used a damp flannel and rubbed until  my skin bled I decided that I’d rather live with the staining than keep going.  I left the dye on for around 30 minutes before rinsing.

And rinsing.  And rinsing.  I was stood under the shower for another 30 minutes in an attempt to get the water to run clear.  Eventually I got bored (and a bit cold) and gave up.  At this point, don’t reach for one of your nice towels – you’ll ruin it.  I’m gonna burn mine to hide the evidence.

Enough talking… it’s just hair dye.  Here’s how it turned out….

BRIGHT!

I’m anticipating that it’s gonna fade quickly (6-8 washes maybe?) so I’ve bought another bottle online and I still have about 1/4 of the first bottle left to go back to my original plan of refreshing the colour by mixing a little in with my conditioner when I wash my hair.  I’ll be honest, I’m a bit unsure of my new ‘do’ – it makes my eyes look really green but I think it clashes with my skintone!

Anyway, that’s the story of how one might become an accidental redhead.  Call it a cautionary tale if you like.

Do you use vegetable dyes?  Got any favourites?!

* oh, by the way, I need to tell you that you all disgusted me, disgusted me with your grubby ways on yesterday’s post – you brilliant, brilliant lot.

The night I thought I’d Trumped myself.

Posted by Lipglossiping On April - 13 - 2012

I bought a hair-dye from TK Maxx last week (it sounds like a bad idea already) and decided that the recent crop of ever-increasing greys needed a severe talking to.  That night, I checked out the packet… L’Oreal Recital Preference Hair Color Ultra Lightening in 6.3, Golden Brown.  I knew I was taking a risk… a). I’ve never tried the L’Oreal Recital Preference range before and b). Golden Brown?  Do I look like Beyonce?  I can’t remember the last time my hair was golden anything.

I calculated my options in my head and decided that I’d spent the whole year being a very careful home hair-dyer.  I’ve been touching up only the roots for a very long time now and felt that the ends had gradually faded in colour.  There was still a lot of build-up but nothing like it had been a year previously.  I deserved to take a chance.

I’ve been wanting to go lighter for a long time, I’m working on the assumption that if my hair is lighter it will make the regrowth a little bit less obvious leading to less-frequent dying and ultimately, healthier hair.  It’s all good right?

Except that I’d do well to remember that I haven’t seen myself anything other than a dark, dark brown for many years.  To put it bluntly, I nearly shat myself when I took the towel off my head.  My grey roots were a delightful shade of Donald Trump, glowing furiously under the hallway light.  Fuck.  I took to Twitter and said as much.  Fuck, said I.

Long story short, a wash or two later and a little bit of time to get used to it?  I’m loving it.  Sure… the roots are lighter than the ends but I’m gonna head to the hair-dressers next week and get it all cropped back to just below my shoulders again which should go some way toward helping the situation.

My problem is that I have no idea where to go from here.  I’m tempted to try and go a touch lighter again… but when and how?  I don’t want to overload my hair or damage it seeing as I’ve been trying to be so good for so long!  I’m giving my hair regular coconut oil treatments and treating it to some proper TLC while I weigh up my next move.  I’m thinking that colour remover thing next… (but not for a few weeks yet!)

Anyone else wanting to go lighter for the Summer?  Are you DIYing it too?

Tried & Tested: Clairol Root Touch Up Hair Dye

Posted by Lipglossiping On August - 13 - 2011

I’ve talked before about over-processing my hair to within an inch of its life and the difficulties I’ve encountered trying to find a happy compromise between routinely covering my greys and keeping my hair in a healthy condition.

Well, I’ve found the answer.  Almost.  It’s not completely perfect… but it’s close enough for now.

Clairol Nice n’ Easy Root Touch Up.  There’s something about paying the same amount of money for LESS product that kills me everytime I approach the counter to pay for this box.  The dye is intended only for use on your roots (you don’t say…), hence you get less in the pack than you would normal hair dye.  It’s not that it’s phenomenally expensive, infact, it’s really good value but compared to my Superdrug own brand Choc Brown that I’ve enjoyed using previously, it is a small step up in price.

However, it’s a little box of awesome.

I pick up shade #4 which claims to blend with all manner of dark browns and I will absolutely back those claims.  It’s never looked at all out of place alongside my older dye jobs and really does blend quite seamlessly.

I part my hair in its usual parting and apply the dye all along any visible roots, not forgetting the hairline.  Once I’ve saturated these parts, I usually part my hair a little further over in both directions and re-apply to allow room for error.  I usually still have some more dye left over and cover my centre parting too (just in case!)

It only takes 10 minutes before I jump in the shower and rinse.  The entire process is completed in under 20 minutes and because it doesn’t go anywhere near the ends of my hair, is a lot less messy than usual!

My only caveat is that I’ve seen a couple of photos of myself recently (where I’m trying to take snaps of my curls etc..) and I can see a bit of grey peeking through the roots toward the back of my head.  It’s probably been about 4 months since they’ve last been dyed and I either need to grab a normal box dye (which I don’t want to do) or get Mr. L to tackle the harder to reach areas with an extra pack of this stuff.  Better solution I think.

Either way, my ends are getting some MUCH needed respite and my overall hair colour is looking beautifully natural and non-blocky.

Win.

Clairol Root Touch Up is priced at around £4 a pack and available at all the usual outlets (Boots, Superdrug, Supermarkets…)

L’Oreal Sublime Mousse Hair Dye Review

Posted by Lipglossiping On May - 24 - 2011

Hair dyes are taking the proverbial at the minute and I’m *this* far away from being brand loyal for once and going back to Superdrug for my essentials.

The reason I haven’t done so already is because I’m loving the (newish) mousse formula for a mess-free application.  I have previously reviewed the two other main contenders on the market if you’re interested in comparing.  Individually, I found them lacking… they had their strengths but also displayed weaknesses that I wouldn’t be able to overcome when it was time for a repurchase.

Which meant I was pretty excited to see a new mousse formula on the shelves when I trotted back to the chemist for a replacement.

L’Oreal Sublime Mousse in #40 Pure Dark Brown caught my attention in an instant.  I was practically clapping like a seal as my eyes drifted over the wonderfully ashy-looking shades in the range.  Ashy suits me well, red tones make my face look even pinker and as Summer approaches, I can do without the permanent flushed look.

Application was good, though I was a little disappointed to see the usual (too big) plastic gloves included.  I’ve been spoilt by the proper latex ones John Frieda’s product provided!  The instructions were precise and clear and didn’t incorrectly tell me to ‘shake the bottle’ as I experienced with the Clairol either…. so far, so good.

30 minutes of developing time later, at least it covers the greys….

Let’s just say… I’ve been using anti-dandruff shampoo daily in an attempt to fade it.

Not only that but the colour is leaching as a semi-permanent might.  How do I know this?  My white 500 thread count Egyptian Cotton pillowcase tells me so.  Yeah, I’m ecstatic about that one.

L’Oreal Sublime Mousse Hair Colour is available to buy from most usual stockists inc. Boots priced at around £6.99

.

What are your preferred hair colourants at the moment?

Foaming an opinion on hair dye… *groan*

Posted by Lipglossiping On February - 12 - 2011

The thought of dying my hair is genuinely one of the dreariest prospects I encounter every couple of months but for me and my grey hairs, it’s a necessary evil.  It smells, it stains and it’s a downright chore.

When I first heard about the new foam hair dyes entering the market late last year, I thought “oh hai new gimmick, I’m still going to hate using you”.  I was right.  Just not entirely…

The first one I tried was the John Frieda Precision Foam Colour* which retails at around £9.99.

It’s more money than I normally pay for a home colourant but I’m sure it’s one of those that will eternally be on special offer somewhere.  Having said that, it’s freakin’ fantastic.  It dispenses a rich, creamy foam from start to finish with crystal clear instructions, great packaging (and awesome gloves that fit properly!)

You can tell when thought and careful planning has gone into the details… and here, the quality is apparent even down to the fact that the dye wipes off skin beautifully without compromising on potency!

However…

The available shades for brunettes suck.  They’re all fairly warm-toned and if you’re a pink-faced girl with a penchant for ashy tones, this isn’t good news.  Would I buy it again?  Only if I want gingery grey bits when the dye fades.  So, um… probably not.

.

The second one I tried (and I’m sat here with freshly dyed hair now) is the Clairol Nice n’ Easy Colour Blend Foam* which normally retails at a more palatable £6.99.

Props to Clairol for a stonking range of shade availability.  Everything from cool to warm tones, darkest to lightest… However, I got beef with this brand.

The instructions included in the box are terrible and led me to over-mix the formula thus producing crappy foam.  The instructions state: “Shake bottle until completely mixed”.

Watch this…

Now, to my mind… “Shake bottle until completely mixed” is a truly rubbish way to communicate to your customers “give it three firm shakes and then leave it alone for 30 seconds”.  No?

I followed the pack instructions, held the bottle, closed my eyes and shook vigorously for about 10 seconds until I was convinced that the products would be nicely mixed.

The result was a runny foam that applied nothing like the creamy John Frieda formula.

This stuff also stains like a four year old running around with a plate of spaghetti.  As a home hair-dye veteran, I’m used to wiping the backs of my ears, that pesky patch where a strand inevitably drops onto your shoulder and the annoying bits on the temples where you want to cover the baby greys but not the skin.  I usually do a grand job of it too.

Unfortunately, I’m sat here now with pretty bad skin staining on my temples.  Do I risk applying a barrier cream and not getting the coverage I need on those greys?  I don’t know… All in all, it’s a disappointing performance from the Clairol.

I’m genuinely upset about this because the colour selection is fabulous, the end result is good (though not as glossy as the John Frieda) and in theory, I love the foam formula which makes it almost impossible to ‘miss’ bits.  I don’t have to faff about parting my hair to get into the roots… I just treat it like I’m shampooing with a creamy lather and the formula does all the hard work for me.  Foam hair dyes have truly been a revelation.

Not only that, but in both instances, the dye has rinsed down the plughole like a dream with the water running clear after only a minute or two at the most.

.

Which should you buy then?

If you’re looking for red tones, buy the John Frieda and do it now, while it’s on offer.

If you’re wanting a cooler-toned shade… go for the Clairol but beware the misleading pack instructions and be sure to use a barrier cream such as vaseline on your hairline.

The future’s bright and it’s rather foamy.

*press samples

Schwarzkopf Palette – An afternoon at the Schwarzkopf Academy

Posted by Lipglossiping On December - 7 - 2010

I’ve been dying my hair since the age of 14… first pillar box reds and harsh blacks – anything to be different which was ironic really, considering I used to simultaneously do anything I could to fade into the background.

At the age of 17, I discovered my first grey hair… and since then, they’ve been coming in thick and fast.  I now dye my hair (roots) every 8 weeks or so to keep on top of it.

I attended a masterclass at the Schwarzkopf Academy back in October.  It was focused on their Palette range of home hair colourants and aimed to demonstrate the very best way to achieve great results at home.

Let me show you a video from the afternoon (if you spot me, please ignore the horrendously unflattering camera angle… it’s not my seven chins, it’s the bloody angle alright?)

I’ve found the Schwarzkopf Palette dye gives a beautifully natural and glossy result.  It’s not particularly different to anything else I’ve tried in terms of application although I found that it was a tough cookie in terms of staining… definitely a little harder to remove than my normal product.  It was also a lot less ammonia-stinky than my normal Superdrug hair dye… a welcome discovery!

My favourite thing about the Schwarzkopf Palette formula though is that I don’t get the “Lego Hair” thing that I usually notice with home hair dyes.  Are we all familiar with “Lego Hair”?  That horribly obvious single block of colour that screams “I’ve just given myself a cheap home hair-dye job!”.  The Schwarzkopf Palette range appears to melt into my own natural highlights and lowlights instead of overwriting the lot.

Freshly coloured hair, what a lovely feeling!

Some tips I learned from the day:

– Wash your hair if it’s greasy or full of oil-based product (hairspray/mousse is ok)
– Apply your hair dye to the point of saturation (one of the biggest mistakes people make is not using enough product)
– Custom mix your colours – it’s far easier than I imagined to create a personalised shade!
– You can’t lighten pre-coloured dark hair
– Grey hair needs extra processing time
– Use moisturiser to protect the skin or vaseline, but don’t get any vaseline on your hair or the colour won’t take.
– There’s no need to shampoo after dying unless you want to.
– To protect your clothes, use a bin liner with a hole cut in it for your head!
– Section off your roots and concentrate the colour there.  You can smoosh the ends in to ensure they get even coverage later.

Schwarzkopf Palette comes in a range of 12 shades from a light natural blonde right through to black.  It’s available instore at Boots, Superdrug and some supermarkets priced at around £3.49 – bargain!

Tints of Nature – Natural Hair Colours

Posted by Lipglossiping On October - 23 - 2010

Considering that it’s something I’ve been doing since the age of 15, I’m a bit embarrassed to come to the realisation that I know practically nothing about the actual process of hair colouring.

I started going grey when I was 17 and I’ve now reached the point where unless I’m happy to embrace a more natural look (I’m not), I need to dye my hair every 6-8 weeks.

Thankfully, home hair dye technology has reached a stage where it’s pretty darn fantastic.  We can all go to our local chemist and pick up Salon quality products to take home with us at a fraction of the price.

Tints of Nature, based in the New Forest are a local brand to me.  Well, compared to many brands, they’re local to all of us as their products are manufactured within the UK.  Their niche is in the natural hair market where they provide colourants, shampoos and treatments designed to be as gentle on your hair as possible.

The colourants contain no ammonia, sulfates or resorcinol and are paraben free.

Divided into two clear groups: The Natural Colours & The Fashion Colours, both offer permanent coverage.  Sadly, only the Natural Colours are recommended for covering grey hair which for someone like me, rules out the more adventurous shades as I cannot compromise on complete coverage.

I was sent a pack of the Natural Colour permanent dye in shade 2N Natural Darkest Brown for review consideration and I was curious to see how well it would blend with the colour already present once my roots got to that “Oh my god, you ARE NOT leaving the house looking like that” stage.

Perhaps not the most stylish or eye-catching packaging design, what the product lacks in kerb appeal it makes up for in eco-credentials as all components are recycled and recyclable.

You apply as you would any other dye, so it thankfully wasn’t too much for my puny brain to cope with on a Monday evening.

The results were good, natural and all grey was covered well as promised.  I’m not the neatest home hair-dyer in the world and one thing this product excelled at was the oh-so-important “will it come off your ear lobes” test!  It was also  less fumey than my usual Superdrug dye.

At £8.99 a pack, it’s also heading towards being twice the price of my regular product.  I think it’s something I would make the effort to pick up whenever I felt that my hair needed a break from the harsher products on the market.  Do you ever get hair dyers guilt?  When you know that your ends are feeling a bit frazzled but you HAVE to fix those roots?  This is when I’d call on the Tints of Nature range to help me out of a jam.

Tints of Nature products are available to buy online and in certain stockists.  Check the website for details.

Would You?

Posted by Lipglossiping On May - 18 - 2010

Just curious…

Betty Beauty… for the hair “down there”.

Is it wrong to be kinda tempted by Malibu?  Maybe I could pair it with my Lime Crime “No She Didn’t” lippie?

£16.50 each err… box.

The closest thing I have to a HG…

Posted by Lipglossiping On February - 16 - 2010

…is my hair dye.

I’ve been using Superdrug’s Colour Performance for the best part of 5 years and simply haven’t found anything better for the price.

It’s a permanent dye which is gentle on my sensitive scalp.  A few others that I’ve used in the past *cough Excellence Creme cough Nutrisse* have irritated and left my scalp sore despite patch tests.  Colour Performance leaves me with no irritation at all.

I generally either plump for the shade shown (3:0 – Natural Rich Darkest Brown) which is a very dark brown or (4:0 – Natural Dark Brown).

One of the reasons I give these hair dyes so much love is because the browns are ashy in tone.  Red or mahogony based browns tend to clash with the pink tones in my skin, so I’m happier with these ashier shades which are surprisingly hard to find on the high street.

Dying my hair is a chore I hate the thought of, but once I’m done… I’m always left wondering why I left it so long.  This dye is foolproof and has consistently returned great results for me *whispers* even over my dodgy grey roots… I’ve unfortunately been going grey since I was 19 *sniff*.

And then there’s the price… I usually buy 2 of these at a time when they’re on offer. 2 for £5.  I think individually, they’re around £3.20.  Amazing.

I actually had a mini panic attack when I saw these new packs on the shelf:

Colour Radiance 10. I emailed Superdrug, worried that it meant they were discontinuing my beloved Colour Performance.  “Of course not”, was the reply… “they’re very popular!” Phew!

Have you ever tried Superdrug Colour Performance or Superdrug Colour Radiance 10?

RANDOM

Laser/IPL and possible complications. Look after yourself.

…is my hair dye. I’ve been using Superdrug’s Colour Performance for the best part of 5 years and simply haven’t found anything better for the …

The Sun Ain't Gonna Shine Anymore Giveaway

…is my hair dye. I’ve been using Superdrug’s Colour Performance for the best part of 5 years and simply haven’t found anything better for the …

Sigma F84 Angled Top Kabuki Brush

…is my hair dye. I’ve been using Superdrug’s Colour Performance for the best part of 5 years and simply haven’t found anything better for the …

The tale of the toffee nut latte...

…is my hair dye. I’ve been using Superdrug’s Colour Performance for the best part of 5 years and simply haven’t found anything better for the …

The bareMinerals Skincare Tour

…is my hair dye. I’ve been using Superdrug’s Colour Performance for the best part of 5 years and simply haven’t found anything better for the …

...Mother's Day. Because if you don't, you'll never be allowed to forget it.

…is my hair dye. I’ve been using Superdrug’s Colour Performance for the best part of 5 years and simply haven’t found anything better for the …

NARS Spring 2010 Collection - Swatches & Review

…is my hair dye. I’ve been using Superdrug’s Colour Performance for the best part of 5 years and simply haven’t found anything better for the …

Pukka Nourishing Brightener

…is my hair dye. I’ve been using Superdrug’s Colour Performance for the best part of 5 years and simply haven’t found anything better for the …

A purple FOTD with Alice...

…is my hair dye. I’ve been using Superdrug’s Colour Performance for the best part of 5 years and simply haven’t found anything better for the …

Topshop Makeup A/W 2010 - Heavy Duty

…is my hair dye. I’ve been using Superdrug’s Colour Performance for the best part of 5 years and simply haven’t found anything better for the …

POPULAR

CLOSED: Competition Time: Givenchy Very Irresistible L'eau en Rose Perfume!

…is my hair dye. I’ve been using Superdrug’s Colour Performance for the best part of 5 years and simply haven’t found anything better for the …

CLOSED - Win it! The Body Shop Expert Brush Collection

…is my hair dye. I’ve been using Superdrug’s Colour Performance for the best part of 5 years and simply haven’t found anything better for the …

Win a gorgeous "glow" trio with prizes from Urban Decay, New CID, & Arbonne!

…is my hair dye. I’ve been using Superdrug’s Colour Performance for the best part of 5 years and simply haven’t found anything better for the …

Hello? Is this thing on?

…is my hair dye. I’ve been using Superdrug’s Colour Performance for the best part of 5 years and simply haven’t found anything better for the …

Avoid the brush off with Oral-B Pro-Expert

…is my hair dye. I’ve been using Superdrug’s Colour Performance for the best part of 5 years and simply haven’t found anything better for the …

Big savings on French Pharmacy brands, win my Escentual.com top picks!

…is my hair dye. I’ve been using Superdrug’s Colour Performance for the best part of 5 years and simply haven’t found anything better for the …

Win it! 3 EcoTools Bamboo Bronzer Brushes to win!

…is my hair dye. I’ve been using Superdrug’s Colour Performance for the best part of 5 years and simply haven’t found anything better for the …

FOTD Busting out of the comfort zone!

…is my hair dye. I’ve been using Superdrug’s Colour Performance for the best part of 5 years and simply haven’t found anything better for the …

Dear Obesity...

…is my hair dye. I’ve been using Superdrug’s Colour Performance for the best part of 5 years and simply haven’t found anything better for the …

Urban Decay The Black Palette - Photos & Swatches

…is my hair dye. I’ve been using Superdrug’s Colour Performance for the best part of 5 years and simply haven’t found anything better for the …

COMMENTS

  • Categories

  • Archives

  • Admin

  • Ads