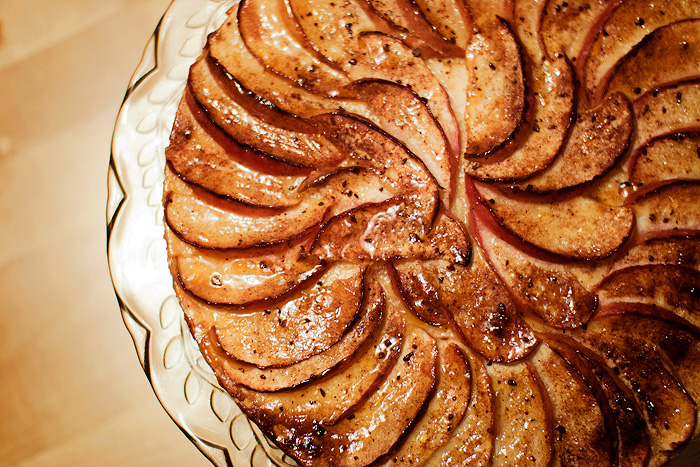
I’m really fussy about chocolate brownies, infact… so fussy am I, that I hardly ever order them when I’m eating out.  Do you know why that is?  Because I can’t remember the last time I enjoyed a decent chocolate brownie.  They’re always too dry… too cake-like.  I don’t want a square of dried-up old chocolate cake masquerading as a brownie.  Don’t try and placate me with a handful of chocolate drops strewn about the crumbs.  That won’t do.

I want a brownie that practically squelches between my teeth.  I want a brownie that basks in its own decadence… I want a brownie that makes me question whether I can even finish it… that’s how rich and super-chocolatey I want my brownies to be.  Now, can you see why I never order them?  I’m a brownie-snob.  That’s what I am!

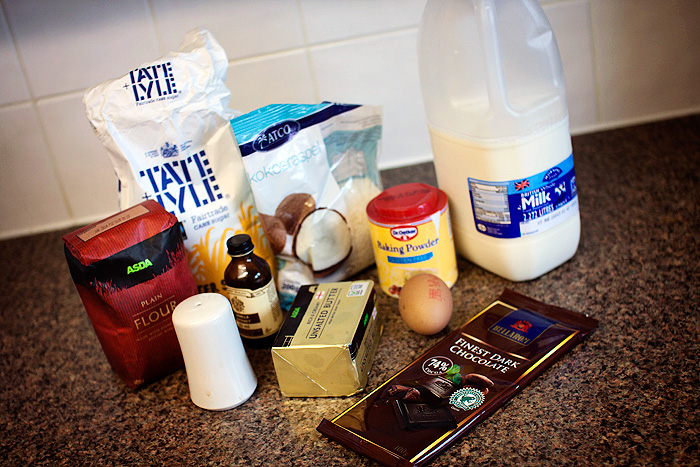
Leila and I received a lovely hamper from the sugar-company Billington’s last week, containing a few choice ingredients that they felt would result in the perfect chocolate brownie.  Of course, in the interest of science, my daughter and I felt the need to test this theory without delay.

bake-face-4

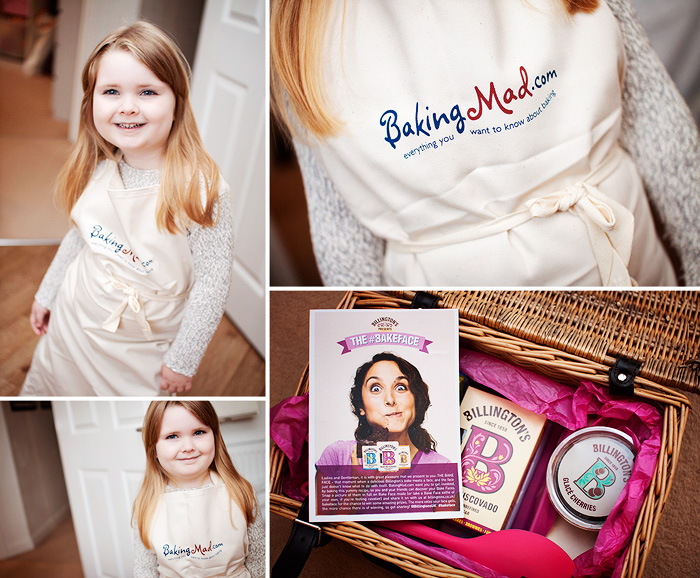
She’s so proud of her new apron.  I don’t think it’s going to stay clean for long… do you?

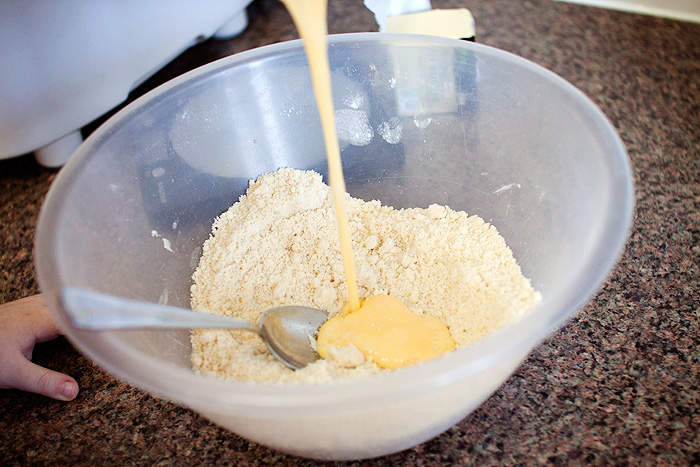
Along with the hamper, Billington’s sent a Chocolate Brownies Recipe card that promised indulgent, squidgy pieces of brownie heaven.  They recommend the addition of glace cherries and dark muscovado sugar, I’ve never had cherries in a brownie before… have you?

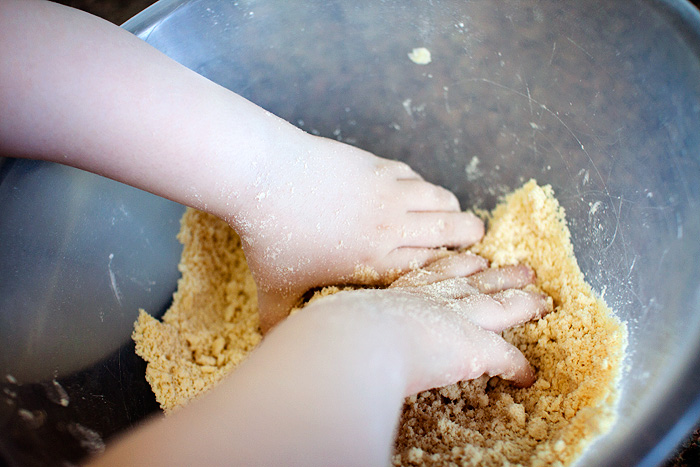
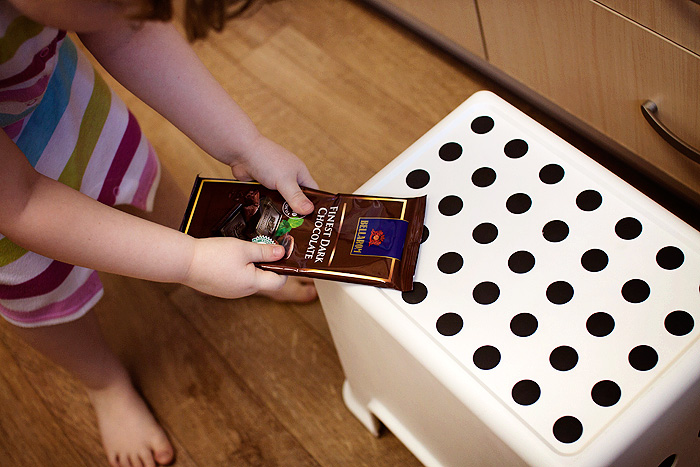
The recipe calls for 300g of dark chocolate, and it nearly broke mine and Leila’s hearts to raid our chocolate stash… she was getting ever more hesitant as she got to the last bar.  “Are you sure it needs all this chocolate, Mum?”

“‘Fraid so!”

bake-face-3

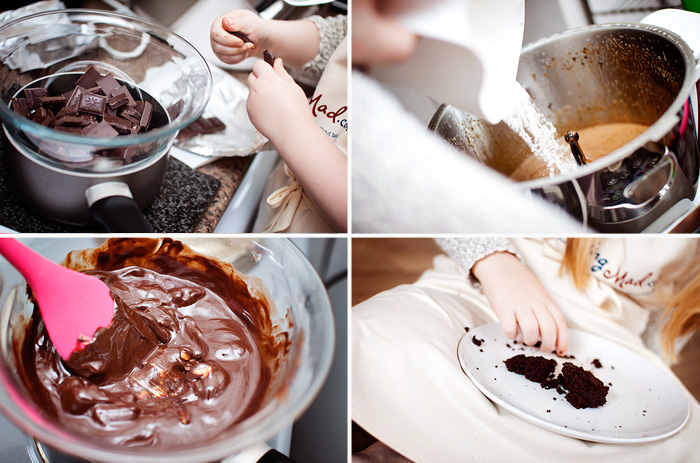
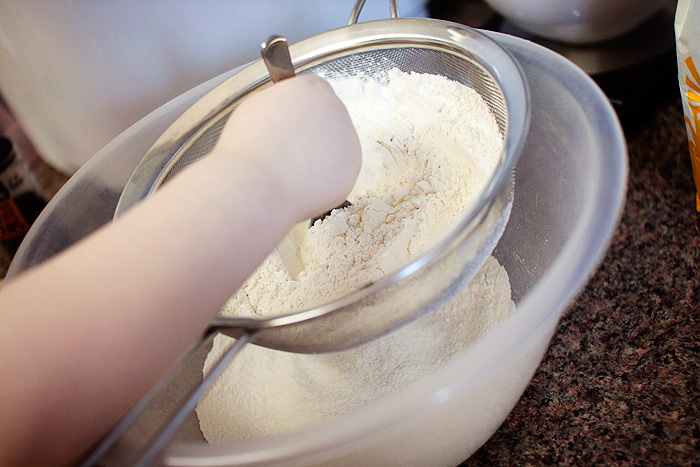
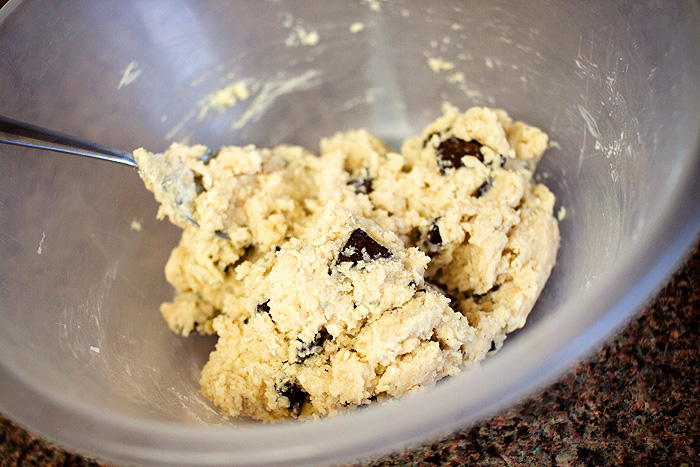
Once we’d melted, mixed, sieved, stirred, and whisked our way through the recipe, it was time to put them in the oven.  Those ensuing 30-minutes felt like the longest of our lives.  The smells wafting from the kitchen were tantalising!

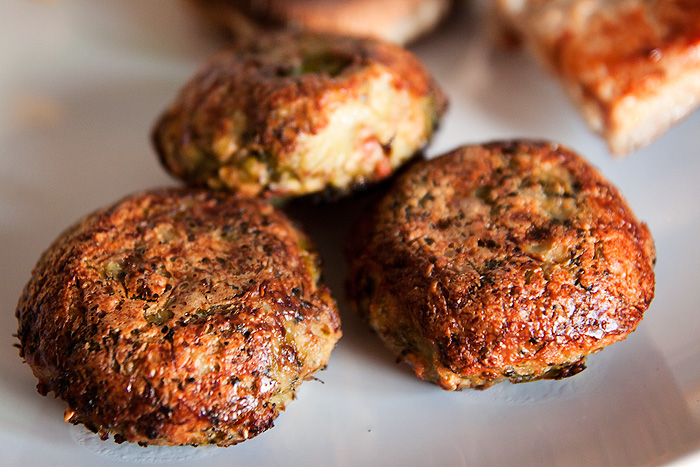
Finally, the timer beeped and we dived for the oven door.  Letting them cool for nowhere near as long as we should have, we began to cut into the squidgy slab of sinfulness.

Unfortunately, I had to wait a little longer than I’d anticipated before I could sink my teeth into a square.  You see, I’d also accepted Billington’s mission to capture a #bakeface.  You know… that face you pull when you’re indulging in the sweet excesses of gluttony.  Basically, cake.  You know and I know that cake brings a special kind of happiness that salad can only dream of aspiring to!

bakeface-2

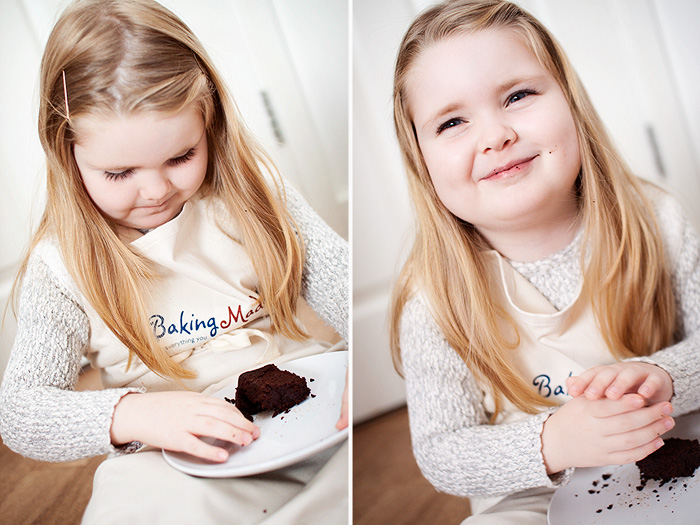
It was quite hard to capture Leila’s #bakeface to be honest as she was mostly positioned face-first into her plate.  After a lot of patience – and the fear that I might have to give her another square of brownie in the name of capturing it – I got one.  That final bite.  The understanding that it’s all gone.  And then the cherished realisation that you have at least another 5-licks worth attached to your fingers!
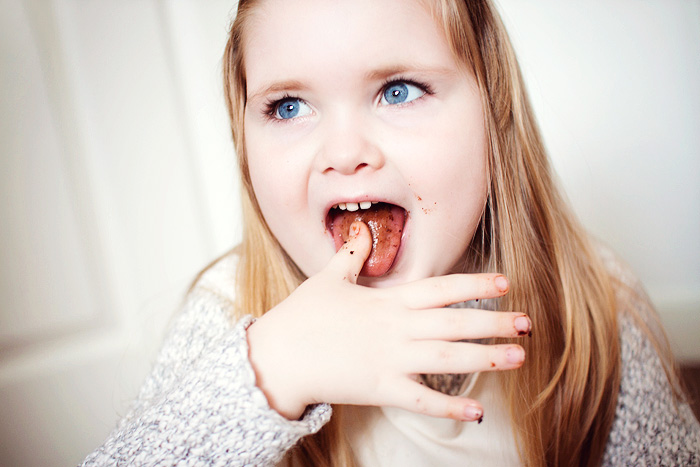
bakeface

Gotcha #bakeface!

If you’d like to enter your best #bakeface – Billington’s invites you to upload your snap to http://bakeface.billingtons.co.uk/ for the chance to win some amazing prices. The more votes your #bakeface gets, the more chance there is of winning!

* Billington’s provided me with some of the key ingredients of this recipe

if you liked this post, please don’t forget to check out my subscriber options, here


Food Friday: Brioche Vendéenne

Posted by Lipglossiping On September - 16 - 2014

When I think about French food, I think fuss… showiness… style over substance…

In case you’re wondering, I pretty much think about British food as the complete opposite.  I mean, how could you not equate fuss and frippery with a country famous for producing cute little boxes of multi-coloured macarons for heaven’s sake?  Suffice to say, I usually steer clear of attempting to recreate French cuisine.  I am not a patient cook and I am, in no way at all, a perfectionist.

Which is why I wasn’t at all sure about my strange hankering to rustle up a loaf of brioche.  And not just any old brioche, but the kind of brioche that I grew up with when I spent my summers in the Vendée.

The Vendéenne Brioche is all about a light, cakey texture with just the right amount of sweetness.  Many in France will spread their morning slice with jam but I’m an all-butter purist, just make sure that it’s *proper* butter though, ok?

brioche-vendeenne

My brioche recipe is fairly basic as most go… I didn’t attempt to add Orange Blossom Water as some do and the same goes for rum!  I wasn’t going to spend £££ (or should I say ) on ingredients that I might never use again.  However, now that I’ve got the basic recipe under my belt, I may be a little more adventurous next time.

You will need:

220ml milk (regular or semi-skimmed, no fully skimmed please!)
1 large egg, beaten
85g caster sugar
80g butter, room temperature
10g fast-action yeast
500g plain flour
1tsp salt
1tsp vanilla extract (good quality)

If you’ve got a stand mixer with a dough hook, I ain’t gonna lie… all the better.  But of course, this can easily be done with some good old-fashioned elbow grease.

Warm the milk to around 35 degrees celsius (tepid) before adding the sugar, vanilla extract, and beaten egg.  Then in this order: add the salt, the butter, the flour, and finally the yeast.

Bring the ingredients together until a smooth dough forms, making sure that you’ve combined all the ingredients well.

Place the dough into a bowl, covering it with a tea-towel and leave it to rise for 1 hour in a warm place.  I usually turn the oven onto 50 degrees c for around 2-minutes before switching it off, letting out a little of the heat (you want it warm, not hot!) and then shutting the oven door on my dough after another minute has passed.

After an hour, your dough should have (roughly) doubled in size.

Tip your dough onto a lightly-floured surface and punch it to release the gas from the yeast.  Split it into two equal halves and get ready to braid.

I use this video for braiding inspiration… it’s a lot easier than a 3-stranded braid and looks super-authentic once baked!

Once braided, place your brioche onto its cooking surface.  I prefer to cook my brioche (and other breads) on a silpat or parchment-lined baking sheet but you can pop it in an oiled tin if you prefer.  Put it back in the oven (or other warm place) for a second rise, another hour will do.

Brush the surface of your brioche with egg (add a few drops of white vinegar for a super-shiny crust) and bake it in the centre of a preheated oven at 180 degrees celsius for anything between 20-30 minutes.  Check the colour of the top regularly to get an idea of how quickly your loaf is cooking.

Once removed from the oven, let it cool and enjoy the fruits of your labour with a generous slathering of butter, or jam… or both if you’re feeling particularly decadent!

brioche

Bon Appetit!

if you liked this post, please don’t forget to check out my subscriber options, here

Chips for tea? Yep. Swede ones!

Posted by Lipglossiping On July - 29 - 2014

swede chips lipglossiping

We all know what normal chips taste like (bloody amazing, that’s what), and while many of us are familiar with the delights of sweet potato and butternut squash chips… perhaps you’re not so aufait with the thought of swede ones?  This much maligned veg, stuff of every school-dinner taker’s nightmares… surprisingly, makes one mean chip!

Starting with your swede.  If you’re choosing at the supermarket, go for one that is small but feels dense… that’ll result in the nicest, sweetest tasting chips of all.  Avoid any that feel a bit light for their size and don’t worry about how ugly and nobbly they are, swedes run celeriac a close second for “ugliest vegetable in the aisle” trophy!

IMG_6070

mine was already half-peeled ‘cos I’m lazy like that

Chip your swede using a sharp knife, if you’re a regular with butternut squash, a little swede will pose you no problems!  Tip: Around 400/500g uncooked weight allows for a decent cooked portion for one person.

Try to keep the “chips” as uniform in size as possible, I went for fairly skinny fries but you can also wedge them if you prefer a chunkier chip.

IMG_6076

Put them in a pan of slightly-salted water and par-boil them for 10-12 minutes, this step is essential if you don’t want to bite into a rock-hard “chip” when they come out of the oven later.

IMG_6089

Once drained, allow them to sit for a couple of minutes to let some of the steam evaporate… alternatively, pat them dry with some kitchen towel.

Season your par-boiled chips, I like to use cumin and chilli powder on mine, generally aiming for around 1/2tsp of cumin and a 1/4tsp of chilli.  I also spray them lightly with frylight.

I use my Tefal Actifry to cook swede chips but you can easily do them on a baking sheet in the oven too, just crank the temperature up to 220 degrees celsius (425 fahrenheit) and be more generous with the oil if you’re cooking the conventional way!

IMG_6095

After around 30-minutes, they’re ready to go!  Don’t forget a sprinkle of salt, what is any chip without it?

And there you have it.  The swede chip.  Extremely tasty, healthy, and a great low-carb alternative to the potato variety.  Personally, I prefer these to butternut squash ones… the texture is a little firmer and more chip-like.

Now, go make ’em!

IMG_6111

if you liked this post, please don’t forget to check out my subscriber options, here

Cauliflower “Rice” in the Tefal Actifry

Posted by Lipglossiping On April - 8 - 2014

In a horrible twist of fate, I ending up buying my much-longed-for Tefal Actifry approximately one week before the price on Amazon finally dropped back down to its current reasonable level.  I’d been waiting since the start of January for the prices to return to some semblance of reality and three months later, they were still higher than they had been since last August.  Considering I’d spent just £90 on the damn thing when I’d bought one for my Mum and Dad pre-Christmas, I just couldn’t bring myself to spend over £130 on the exact same machine just a couple of months later.

And so, fate transpired that I ended up buying a second-hand model from Gumtree, £70.  It wasn’t the 1.2kg model that I’d been hankering after but the smaller 1kg.  I now hate my unfortunate timing and throw the damn thing dirty looks whenever I pass by the kitchen.  Having said that, I made some delicious cauliflower “rice” in it last weekend, a very useful low-carb alternative to the real thing!

Cauliflower Rice in the Tefal Actifry

Why the low-carb alternative?

Well, I’ve only got 4-weeks of pregnancy left and this time around, it’s been trying at times.  The initial sickness was something I’d managed to escape when I was carrying Leila but this time, it hit me like a ton of bricks.  Throw in another run-in with the dreaded PCOS-induced gestational diabetes and I can’t say that I’ve enjoyed this pregnancy as much as my first.

Having said that, nothing will replace the feeling of those little bumps and knocks from the inside out… and enjoying the knowledge that there’s no bond in the world quite like that between an unborn baby and its Mum.  I will dearly miss that intimacy (my baby, all mine!) when he’s out.

So, back to the low carb thing…

As pregnancy progresses, the effects of borderline gestational diabetes tend to become more severe.  Back when I was 22-weeks my insulin deposits could easily cope with a handful of chips and a couple of spoonfuls of rice but now, as I enter my 35th week, I’m not so lucky.  Even the most unrefined of carbs can cause my blood sugars to spike to unhealthy levels.  Time to call on the cauliflower!

Cauliflower Rice in the Tefal Actifry (2)

The first thing you need to do is grate your cauliflower to produce a grain-like texture or alternatively blitz the florets (a handful at a time) in a food processor.

Once the cauliflower has been blitzed, dump it in the bowl of the Tefal Actifry and add a generous tablespoonful of oil.  If you want to add some extra flavour, feel free to experiment with a little spice.  For my Bratwurst & Cauliflower Rice mash-up, I concocted a moroccan-inspired combination that comprised:

1 tsp ground cumin
1/2 tsp ground coriander
1/2 tsp ground ginger
1 tsp ground cinnamon
1/2 tsp black pepper
1/8 tsp ground cloves

Turn on the Tefal Actifry and set the timer for around 25-minutes.  Do keep an eye on it though as you’ll need to re-incorporate any “rice” grains that rise up the side of the bowl as it cooks.  I just use a silicone spatula to push them back down.

Cauliflower Rice in the Tefal Actifry (3)

After 25-minutes, feel free to add some extras.  I threw in a handful of frozen peas, some pre-cooked Bratwurst, and a broken-up plain omelette that I’d cooked on the hob after frying the Bratwurst.  The last 10-minutes in the Actifry ensured that the flavours combined beautifully as the paddle turned and incorporated the spices and oils.

Cauliflower Rice in the Tefal Actifry (4)

Using the Tefal Actifry meant that the cauliflower took on a fried-rice texture and the spices delivered some real flavour to an otherwise bland, low-carb alternative.

The Tefal Actifry (1.2kg model) is currently available on Amazon.co.uk for £109.99 which is the lowest it’s been since early December.  It’s even cheaper than the smaller 1kg model!  If you follow me on Twitter, you’ll know I’ve been on Actifry “price-watch” all year.  I’m fuming!

Do you own a Tefal Actifry?  What’s your favourite thing to cook in it?

if you liked this post, please don’t forget to check out my subscriber options, here

Food: Impress with a lazy girl’s Tarte aux Pommes

Posted by Lipglossiping On March - 3 - 2014

If you ever find yourself in the position of having only 30-minutes to knock up an impressive-looking dessert, then you’ll want to bookmark this recipe.  You might know by now that I love cooking, baking, and food in general but positively hate the faff that goes with it.  This means that most of my “creations” end up tasting good but looking pretty mediocre.

I watch programmes like The Great British Bake Off with a certain amount of jealousy at the participants’ willingness to spend hours decorating their masterpieces with the patience of a Saint.  I will never be that type of cook.  I have been blessed with very little in the way of a “planning” or “patience” gene.

So it is with a great amount of pride that I present to you my lazy version of a Tarte Aux Pommes.  I’ve got a bit of a cheek calling it that to be honest as it contains very few of the original features of a classic Normandy Apple Tart.  There’s no frangipane in there, and there’s no Calvados.  I deal with what I have in my cupboards, which is generally only the kind of stuf that I’m actually using week in, week out.

The thing is though, it tastes lush and it looks the business and I am far from ashamed of it!  Check it out!

tarte-aux-pommes

tarte-aux-pommes2

I’ll begin by saying that I used a 23cm tart pan… one of those ones with a removable base, this is important because depending on the size of your tart… you’ll need more or less apples (and obviously pastry) than I am including in the recipe below.  The safest thing would be to buy a little more than my suggestions, I mean… apples aren’t going to go to waste and if you overmake or overbuy the pastry, make some mini-tarts to go with!

You’ll need:

A packet of ready-rolled shortcrust pastry (I told you this was the lazy version, you wanna make your own? Knock yourself out!)
1 Pink Lady Apple (more if you don’t trust yourself to slice it thinly enough or you want to make a larger tart!)
1 Tbsp Melted Butter (blitz it for a couple of seconds in the microwave in the bottom of a mug)
3 tsp Caster Sugar
1/2 tsp Ground Cinnamon
1 Tbsp Apricot Jam
1 tsp Water

1. Lay your pastry flat with the base of your tart tin on top, trace around the edge with a knife.  Alternatively, you can trace around a dinner plate and bake the tart on a flat baking tray for a custom-size.  Pre-heat your oven to 190 degrees celsius.  You may need to line your baking tray or tart tin with parchment paper, the non-stick on mine is still in pretty good condition thankfully.

2. Quarter your apple(s) – don’t peel them, the pink skin looks lovely when baked!  Remove the core and slice thinly.

3. Arrange your apple slices over your pastry disc in the traditional Tarte Aux Pommes design.  I love some of the “rose” styles but didn’t have the patience!

4. Brush your apples with the melted butter and sprinkle the Caster Sugar and Cinnamon over the top.

5. Bake your tart in the middle of the pre-heated oven for 15-minutes, before moving it to the top shelf for the remaining 15-minutes if your apples are looking a little pale.

6. Combine the Apricot Jam and water in a small dish before brushing the glaze over the top of the cooked tart to give it a lovely shiny finish.

7. Serve warm with some whipped cream!

Tell me if you try this, I’d love to know how you get on!

if you liked this post, please don’t forget to check out my subscriber options, here

Chocolate Chip Rock Cakes

Posted by Lipglossiping On February - 24 - 2014

Rock Cakes were the first thing I learnt how to make at school, crunchy on the outside, soft and crumbly on the inside.  This quintessential British tea-time treats get a bad rep if you ask me, you hardly ever see them offered alongside other cakes in cafes… I guess they’re just not as fashionable as their cousin, the scone.

The usual Rock Cake filling includes sultanas and a few spices but on our last day of half-term, Leila and I thought we’d experiment with a different combination: coconut and dark chocolate.  Yum!

We took the basic Rock Cake Recipe from Baking Mad, a website that lets visitors search for recipes based upon the ingredients they want to use… perfect for any baking-cupboard hoarders like me.  It didn’t take much to jog my memory from ye olde home-economic classes but I was glad to be reminded that I didn’t need 40-thousand ingredients to get to work!

IMG_4263

IMG_4266

You’ll need:

225g Plain Flour
1 pinch of Salt
2tsp Baking Powder
75g Unsalted Butter (or margerine)
75g Caster Sugar
100g Dark Chocolate (broken or chips)
30g Dessicated Coconut
1 Egg (beaten)
1 1/2Tbsp Milk

Preheat the oven to 190 degrees celsius.

IMG_4269

Start by sieving the flour, salt, and baking powder into a bowl

IMG_4274

Rub the cubed butter into the dry mixture until it resembles sand

IMG_4278

Add the sugar and the beaten egg

IMG_4279

Bash up the chocolate!

IMG_4281

Add the chocolate, coconut, and milk and bring together to form a thick dough

IMG_4283

“Dollop” onto a greased or lined baking sheet, you’ll get around 9 buns from this recipe.

IMG_4290

Bake in the oven at 190degrees celsius for around 15-20 minutes (check after 15 minutes!)

IMG_4295

Yum! Enjoy!

If you have a food processor, this recipe would take literally minutes to whizz together… my waistline is just thankful that I don’t have such kitchen gadgetry, otherwise I’d make a batch of these every week!  After a cheeky inset day, Leila is back to school tomorrow… I’m dreading the school run in the morning!

Are you a fan of Rock Cakes?  What’s your favourite filling?

* Baking Mad introduced me to their site and sent some chocolate chips and green icing… but we’re gonna save those for an Easter treat next month.

if you liked this post, please don’t forget to check out my subscriber options, here

Food Friday: Chickpea Burgers courtesy of Patz’s Pantry

Posted by Lipglossiping On September - 13 - 2013

I don’t know man, I mean chickpeas are awesome.  They’re kinda nutty, somewhat meaty, pretty substantial and above all else, packed with fibre.  But burgers? Burgers are on a whole different level…

How could you ever, ever substitute a burger, a proper meaty burger… with one made out of chickpeas?

Let me show you how, courtesy of this recipe from new foodie blogger (and occasional beauty PR ;)) Patrizia a.k.a Patz’s Pantry.

Patz Chickpea Burgers_1

I didn’t have any shallots, so I substituted regular red onions.  I also used breadcrumbs from a pitta rather than regular bread. The rest is as Patrizia has written it.

I won’t list the full ingredient quantities because you should check out her blog for the recipe.  Anyway, it’s such a simple recipe and really quick to knock up in about 25 minutes tops.  Perfect for when you’ve had a long day at work and don’t want to get into anything too taxing.

Patz Chickpea Burgers_2

Once you’ve mashed up the chickpeas (I used a mini food processor and did it in a couple of batches), all you need to do is mix the ingredients together… starting with the spices…

Patz Chickpea Burgers_3

…and then the vegetables (they also went through the food processor)…

Patz Chickpea Burgers_4

…finally, crack your egg into the mixture and add the breadcrumbs.  You might be able to see from the above photo that I also added a cheeky teaspoonful of wholegrain mustard.  Combine everything well.

Patz Chickpea Burgers_5

If you have one of these nifty burger presses, they’re fantastic!  If you don’t, you can still shape the patties by hand… I do recommend a burger press though if you regularly make your own, they’re really cheap and help you eke out those ingredients as well as helping to control portion sizes!

Patz Chickpea Burgers_6

Once you’ve made your burgers, whack them back in the fridge to firm up for 15-minutes before frying over a low heat for around 3-4 minutes on each side.

Patz Chickpea Burgers_7

I pretty much ruined the effect of mine by melting a leftover slice of plastic cheese on top.  I promise it looked far better before I butchered its appearance with the blob of sweet chilli sauce too haha!

Patz Chickpea Burgers_8

I served mine on a pitta bread with some sweet potato fries and a side salad.  It was delicious, truly.

Are you burger fiend?  What’s on the menu tonight?

Food Friday: Chicken Laksa

Posted by Lipglossiping On September - 6 - 2013

I first discovered the joy of Laksa courtesy of an inner-city food court almost 15 years ago.  I was living in Sydney at the time and alternating my lunches between New York Style pastrami sandwiches, Lebanese Fattoush, and Singaporean Chicken Laksa.  Such was the multi-cultural diversity of the city, coming from the British countryside, it was a revelation to taste my way around the continents in such an informal setting.  When I returned, I really missed some of my favourite dishes, and the first one that I had to learn for myself was the Chicken Laksa.

Now, back then… it was practically impossible to find a ready-made Chicken Laksa paste.  There are billions of recipes online describing how to make your own but nowadays, I just buy a jar of paste from my local Asian supermarket – tastes great and much less hassle.  I believe that some mainstream supermarkets stock it now, I’m pretty sure Sainsburys do anyway.

Chicken Laksa is a great dish to serve up when you’re looking to impress.  It’s a warming taste sensation, constructed around a base of chilli and coconut milk, you can customise it to suit your taste for spice just by adding more or less paste.  Not only that but it takes a mere half an hour to put together.

And this is what you need to do it…

Chicken Laksa

Not too many ingredients at all huh?  Just the way I like my cooking!  The above serves 2/3 people.

1 large fresh chicken breast/frozen chicken pieces – I used the meat that I’d pulled from a whole roasted bird after cutting off the breasts.
1 bag of bean sprouts (I use about half a bag for 2 people)
1 bag of noodles (traditionally vermicelli noodles but I’ve used rice, egg, whatever!)
1 can of coconut milk
Roughly 500ml water or chicken stock.  If you’re using water, add some chicken oxo-type cubes to the pan during cooking.
1 jar of Laksa paste (My favourite brand is Yeos – I use a whole jar but this will make it hot, for a milder version, use half a jar)

Apologies that my list is a little vague in terms of quantities, this is one of those recipes that is best judged by the eye as you go along… honest!

Chicken Laksa2

Grab a large saucepan or stockpot and add the paste, coconut milk, water+oxo cubes/stock and the chicken.  Bring to a simmer, put the lid on and stir occasionally until your chicken is cooked through.  How long this takes will depend on whether you’re using raw, pre-cooked, or frozen (pre-cooked) chicken… err on the side of caution and make sure the chicken is fully-cooked/heated to safe temperature.

I usually give it a good 15-minutes bubbling away for pre-cooked, frozen chicken.

Chicken Laksa3

Take note of the water levels and at this point decide if your “soup” is thin enough… if it feels a little too thick, add some more water.

Chicken Laksa4

Throw in your noodles and bean-sprouts and cook for a further 5-minutes before serving.

Chicken Laksa5

Chicken Laksa6

Done!  How easy is that?  And even though I do say so myself, it looks pretty impressive!

I usually serve it with some crusty bread… completely not traditional.  Not bothered either.

One of the best things about Laksa though is just how versatile it is.  If you’re vegetarian, use tofu instead of chicken (although remember to check the paste ingredients, they vary).  If you don’t like chicken, use king prawns instead!

Have you ever made a Laksa?  What’s your favourite way to cook it?

Food Friday: Stuffed Marrow (just like Deirdre used to make)

Posted by Lipglossiping On August - 30 - 2013

If you’re British and don’t get the popular cultural reference in the title, shame on you.  If you’re not British, and do… you’re amazing!

When I was at my local farm food shop last week I spotted a barrowfull of marrows, they were selling them off at 60p-a-piece.  I’ve never had marrow before, stuffed or otherwise… at 60p, I felt that I couldn’t go wrong.

I googled for some recipes but decided that I’d go for the old tried, tested, and somewhat derided route of stuffing it.  Instead of cutting the marrow into two long “boats”, I decided to slice them into 1.5″ thick rings and stuff the middle of those instead.  To my eye, it just looks a little more modern.

The great thing about marrow is that… it doesn’t really taste of anything.  You might think that this isn’t such a selling point, but it absorbs the flavours of whatever you combine it with beautifully.  I felt that combined with the stuffing mix I prepared in the recipe below, the marrow tasted a little like fluffily boiled potatoes (but without the uber-carbs!).  A truly delicious meal.

The recipe below makes enough stuffing mix for the amount of marrow you see in the photos (6 slices, not whole) with enough leftovers to stuff a further two large peppers.  It’s great for cooking up on a weekend and refrigerating a portion for later on in the week.

Stuffed Marrow_1

You’ll need:

500g turkey mince (or any mince you prefer to use)
85g sage & onion stuffing mix
1 marrow
2 onions
1 carrot (shredded
1 tin chopped tomatoes
a glug of worcestershire sauce
1 tsp chilli paste (or chilli powder)
1 heaped tsp of garlic paste (or a couple of cloves)
1 lvl tsp ground coriander
1/2 tsp cayenne pepper (not pictured)
100g green lentils
Water

1 pitta bread broken into breadcrumbs (I prefer the crunch pitta bread gives)
60g grated cheese

Stuffed Marrow_2

Rapidly boiling the lentils for 10 minutes before turning the heat down and continue to simmer for around 30-minutes.

Stuffed Marrow_3

Fry off the turkey mince (I used a couple of sprays of frylight to coat the pan first) and add your spices (coriander & cayenne pepper).

Stuffed Marrow_4

Add the onions, carrots, garlic paste, and a good glug of the worcestershire sauce and allow to simmer for a couple of minutes.

Stuffed Marrow_5

Pour the chopped tomatoes and stuffing mix on top and stir to combine the stuffing mix.  Have a jug of water ready, you’ll need to topup the pan as the stuffing mix absorbs the liquid. You can use a stock cube in the water but I didn’t have one to hand and it was fine.

Stuffed Marrow_6

As your mince is cooking away in the background (keep checking it for water levels, you want it dry-ish but not enough to stick or burn!), it’s time to prepare your marrow.  Marrow might seem like an awkward vegetable to prepare but it’s incredibly easy.  Simply slice of 1″-1.5″ thick pieces, as many as you need.  Using the tip of the knife, cut out the middles and discard.

Stuffed Marrow_7

They should look like the above photo once you’ve finished.

Stuffed Marrow_8

Drain your green lentils once they’ve finished cooking and add them to your stuffing mix, combine well.

Stuffed Marrow_9

Take a baking tray, a sheet of greaseproof paper, and your Frylight spray.  Place the empty marrow rings evenly onto the greaseproof paper and fill with your stuffing mixture.  The mixture will shrink down a little as it bakes so make sure that you fill them generously!  Top with the pitta crumbs and grated cheese.  Lightly spray the rings with some Frylight and pop into a pre-heated oven (200°C/400°F/Gas 6).

Loosely cover the baking tray with foil, try not to let the foil touch the top of the rings (or your cheese will transfer!).  Bake for around 30-minutes, remove the foil and pop back in the oven for another 10-minutes until the top is browned.

Stuffed Marrow_10

They should come out looking something like this!

Stuffed Marrow_11

For me, these are a whole meal in themselves… they don’t need anything to accompany and three slices of stuffed marrow was incredibly filling.  Some people are happy to eat the skins, I didn’t like the texture so sliced mine off just before eating.  Either way, don’t peel your marrow before you cook it, the skins hold everything together!

I do hope you try this one while marrows are still in season.  It makes for an incredibly cheap and filling meal, healthy too!

* Weight Watchers – I pointed this recipe at 9PP per portion for the minced stuffing mix (the whole recipe makes 4 portions of stuffing mix)

A DIY Graze Box for less than half the cost!

Posted by Lipglossiping On July - 12 - 2013

I’m a massive Graze Box fan.  Like a child on Christmas morning, I skip toward the front door when I hear the postman coming every alternate Friday.  *Plop!* as the box hits the doormat, *Squee!* as I grab it in my hot little hands and run off to uncover my weekend treats!

What is it about cutely packaged boxes that suddenly makes the interior of Holland & Barrett look sexy.  There is nothing sexy about Holland & Barrett… or Julian Graves for that matter, probably why they went bust.

Are you one of the few remaining people on Earth who doesn’t know what a Graze box is?  Allow me to enlighten you…

A DIY Graze Box for less than half the cost!

A DIY Graze Box for less than half the cost!

Thai Crackers with Sweet Chilli Sauce | Biscuit with Compote | Florentine Mix | Popcorn

You pay a fee of £3.89 and for your monies, you receive a wee cardboard box delivered to your door, or office… you know, if you have one.  The box contains a selection of four tasty treats, supposedly healthy (usually somewhere inbetween healthy and fattening), definitely moreish.  You can log on to the website at Graze.com and tell them what you like/don’t like… even rating the previous box so that future selections are customised to your taste.  Back in the day, they used to include fresh fruit and other lovely bits in their boxes but what with Royal Mail being shit and letting the fruit ferment… they had to stop all that.

There are a billion offers around for you to try your first Graze box for free, mostly because subscribers get given codes to refer friends and earn themselves money off future boxes.  Here, have mine: 616XG25D for a free box*.

They’re also now doing Breakfast boxes containing four portions of suped-up porridge… usually with things like dried fruit and nuts added, plus a drizzle of honey.  Yum.  Again, ZXRP1YM will get you into the top-secret (not really) Breakfast Club and award you your first box for free*.

…BUT YOU’RE NOT GONNA WANT TO USE THEM!

Because look, I done did my very own Graze Box.  A DIY Graze Box!  And it cost not THREE POUNDS AND EIGHTY-NINE PENCE.  Oh no, it cost a mere £1.67** and contains lots more goodies!

A DIY Graze Box for less than half the cost!

A DIY Graze Box for less than half the cost!

A DIY Graze Box for less than half the cost!

Garibaldi Biscuits | Mini Flapjack | Breadsticks, Cheese & Chutney

Meringue and Yoghurt-coated Strawberries | Florentine Mix | Roasted Chickpeas & Wasabi Peanuts

My favourite thing from my delivered Graze boxes has always been the Florentine mix of pumpkin seeds, cranberries, and dark chocolate buttons so I knew that I wanted to replicate this in my own version (bottom middle).  Infact, this worked out as the most expensive pot (56p), which might have something to do with the fact that I used Montezuma’s Giant Dark Chocolate Buttons (om nom nom).

Garibaldi biscuits (top left) are a much-neglected biccie in my opinion!  On Weight Watchers, you can have three for 3PP… plus they’re pretty inedible without a cuppa but perfect for dunking, making them a brilliant mid-afternoon, tea-break snack.

I wanted an even spread of sweet vs. savoury, so also included a mini-flapjack bite from Asda bakery (top middle)… now I just need to resist the temptation not to polish the rest of them off!

Leila’s passion for breadsticks got me thinking about their potential for grazing on (geddit?), so I picked up some mini wholewheat breadsticks, a jar of tomato chutney, and a Babybel Light (top right).  It’s like a cheese and pickle sarnie in skinny form… um, sort of.

The bottom left selection is another for my sweet tooth.  It features a broken meringue nest and yoghurt-covered dried strawberry pieces!

Finally, I included a pot with a comination of dry-roasted chickpeas and wasabi peanuts (bottom right).  So spicy, so good!

Obviously the initial outlay to make your own Graze boxes is something to think about… but as an ongoing thing, this box worked out at £1.67 for the lot.  As far as quantities go… my Florentine mix weighs in 40g, only 1g less than the Graze version… but do you know the really cool thing?  Mine is 5PP… theirs is 6PP!

Would you make your own Graze box?  What would you put in it?

* both codes are affiliated, I get £1 off my next box if you use them (I think).  Please don’t use them because now I have a cupboard-full of seeds and dried fruit to use up!

** ignoring the £5845893 I spent on tiny, tiny boxes

Weight Watchers Friendly: Chipotle Chicken Wrap

Posted by Lipglossiping On July - 8 - 2013

“Ugh, it’s too hot to cook!” says me.

“Hungry!” says everyone in the flat who doesn’t have to contemplate entering the kitchen.

The thought of even putting the oven on makes me wanna stick my head in it whilst I’m there. I’ve got all the windows open (curtains closed of course) and this has afforded me a little insight into the UK’s problem with inbreeding. The mercury rises above 25 degrees and everyone outside feels the need to raise their voices because sound doesn’t travel well through heated airwaves?

I’ve had: “Does your MUVVER know you’re buying WEED?!” shouted down the road… not once, but four times (just in-case we didn’t all hear this revelation the first time round). Followed up with what sounded like the ice-cream van having a seizure over and over and over. It’s always the same around here when the sun comes out, Mr Marucci circles these lanes like a vulture, he just won’t stop until we’ve all got fucking ice-cream headaches. And that’s without consuming a single 99er. You know the tune? We’ve always told Leila that if they play the music, it means they’ve run out of ice-cream.

I’m grumpy. Can you tell? But I’m also hungry… and I need to go to the gym later (hardcore gym bunny now). Hence, I need to eat. Without much effort… here’s what I’m making tonight.

Weight Watchers Chipotle Chicken Wrap_1

The cast of characters include:

2 Warburtons Squareish Wraps
1 cooked chicken breast, shredded
1/2 an onion, sliced
handful of frozen peppers (I always buy frozen, who can afford fresh?)
2 mushrooms, sliced
1tbsp tomato puree
2tsp chipotle paste
1tbsp natural yoghurt
1tsp olive oil
salad-y stuff

Make up your side salad first, this cooks fiercely and quickly – you don’t wanna be mucking about trying to slice tomatoes while the pan behind you is on fire.

Weight Watchers Chipotle Chicken Wrap_2

Heat a tsp of olive oil in a frying pan and add the vegetables, stir-frying quickly over a high heat until well-softened.

Weight Watchers Chipotle Chicken Wrap_3

Add the tomato puree and chipotle paste, return to the heat and combine everything evenly before adding the ready-cooked shredded chicken to warm through.

Weight Watchers Chipotle Chicken Wrap_4

Remove from the heat and spoon over a tablespoonful of natural yoghurt for a touch of creaminess.

Weight Watchers Chipotle Chicken Wrap_5

Divide into two portions and spoon into your wrap. Serve with your side salad and enjoy!

Weight Watchers Chipotle Chicken Wrap_6

Weight Watchers Chipotle Chicken Wrap_7

How simple is that? Probably too bloody simple to bother with a blog post about it but it was either this or order something from Dominos, which we know wouldn’t be Weight Watchers friendly! As far as the points go, this came in at a truly wonderful 7 Pro Points. Leaving plenty of points for a refreshing gin and tonic (or seven) later.

If you like Mexican flavours, a jar of chipotle paste should be a permanent staple in your fridge…. you get all that wonderful smokey Mexican flavour without the heat… and let’s face it, who needs anymore of that today?

Let me know if you try this one out! What do you cook on days when you just wanna declare the kitchen a dead-zone?


Making vegetables tastier: Broccoli Tots

Posted by Lipglossiping On June - 27 - 2013

5 a day. Do you?

I don’t… although God loves a tryer.

The problem with vegetables is that they’re just alright.  I’m simply not gonna get excited over a carrot in the same way that I get excited over a slice of cheesecake.  Thems the breaks veg… you don’t make me want to eat you, it’s your fault, not mine.  Have you ever thought about that?

And so, in my endless quest of ways in which I can make vegetables tempt me… I wanted to make a slightly-more-healthy version of my much-loved courgette fritters… except, with broccoli, baked rather than fried.  ‘Cos that’s what I had.  Lots and lots of slightly-yellowing broccoli bought with the best of intentions.

Here’s what I did:

Broccoli Tots_01

The cast of characters included:

2 medium-sized heads of Broccoli (don’t de-stalk this too vigorously)

1.5 cups breadcrumbs (I used Weight Watchers Malted Bread – 3 slices, Panko would be great!)

30g grated parmesan (I love the Lidl one)

A generous squirt of English Mustard

1 medium egg

3 Tbsp egg whites (or just use another medium egg if you’re not points counting!)

1 tsp garlic paste

3/4 tsp smoked chilli flakes (you can substitute this for any seasoning you’d prefer)

Preheat the oven to 190 degrees celsius (180 fan)

Begin by chopping the broccoli into small, less than bite-size pieces and steam them for a couple of minutes until tender.  Once cooked, add all the ingredients one by one, mixing as you go to ensure you get everything evenly combined.

Broccoli Tots_02

Take a bun tray/muffin tray or similar (I use this 12-cup one from Asda) and give it a light spray with cooking oil.  Use your hands to gently shape the mixture into golf-ball sized balls and place into the hollows of your bun tray.

The mixture should feel quite wet, the broccoli tots will spread a little whilst cooking but retain their shape within the hollow.

Broccoli Tots_03

Bake on the middle shelf for 15-minutes then remove from the oven and flip each tot over.  Pop back in the oven for another 10-15 minutes.

Broccoli Tots_04

Broccoli-Tots_05

The beauty of these veggie tots is that I’m already thinking of all the other vegetables I could cook like this.  I would love to do bubble and squeak… something which I LOVE but can never get brown and crispy in a frying pan.

The parmesan was great but I think I might try it with a bit of reduced fat mozzarella next time… or even a sprinkle of my beloved blue cheese.

As far as the Pro Points go… these worked out at 2 Pro Points per three tots or nine points for the whole tray of twelve!  Not bad for a plate-filling side.  If you’re up for a bit of batch cooking, these will also freeze beautifully, just heat  them up from frozen in the oven at around 200 degrees for 15-minutes and they’re perfect.

What are your favourite ways of making vegetables more tempting?

RANDOM

Get Lashed Lashes at Nails Inc.

5 a day. Do you? I don’t… although God loves a tryer. The problem with vegetables is that they’re just alright.  I’m simply not gonna …

Elf Studio

5 a day. Do you? I don’t… although God loves a tryer. The problem with vegetables is that they’re just alright.  I’m simply not gonna …

Pick your own!

5 a day. Do you? I don’t… although God loves a tryer. The problem with vegetables is that they’re just alright.  I’m simply not gonna …

NARS SS/10 - The Runway Looks

5 a day. Do you? I don’t… although God loves a tryer. The problem with vegetables is that they’re just alright.  I’m simply not gonna …

Diamond Cosmetics - Decadence NOTD

5 a day. Do you? I don’t… although God loves a tryer. The problem with vegetables is that they’re just alright.  I’m simply not gonna …

Barielle - A Bouquet for Ava NOTD

5 a day. Do you? I don’t… although God loves a tryer. The problem with vegetables is that they’re just alright.  I’m simply not gonna …

Swatch Saturday: Fyrinnae

5 a day. Do you? I don’t… although God loves a tryer. The problem with vegetables is that they’re just alright.  I’m simply not gonna …

Butter London Trout Pout NOTD

5 a day. Do you? I don’t… although God loves a tryer. The problem with vegetables is that they’re just alright.  I’m simply not gonna …

The tin foil trick...

5 a day. Do you? I don’t… although God loves a tryer. The problem with vegetables is that they’re just alright.  I’m simply not gonna …

The closest thing I have to a HG...

5 a day. Do you? I don’t… although God loves a tryer. The problem with vegetables is that they’re just alright.  I’m simply not gonna …

POPULAR

CLOSED: Competition Time: Givenchy Very Irresistible L'eau en Rose Perfume!

5 a day. Do you? I don’t… although God loves a tryer. The problem with vegetables is that they’re just alright.  I’m simply not gonna …

CLOSED - Win it! The Body Shop Expert Brush Collection

5 a day. Do you? I don’t… although God loves a tryer. The problem with vegetables is that they’re just alright.  I’m simply not gonna …

Win a gorgeous "glow" trio with prizes from Urban Decay, New CID, & Arbonne!

5 a day. Do you? I don’t… although God loves a tryer. The problem with vegetables is that they’re just alright.  I’m simply not gonna …

Hello? Is this thing on?

5 a day. Do you? I don’t… although God loves a tryer. The problem with vegetables is that they’re just alright.  I’m simply not gonna …

Avoid the brush off with Oral-B Pro-Expert

5 a day. Do you? I don’t… although God loves a tryer. The problem with vegetables is that they’re just alright.  I’m simply not gonna …

Big savings on French Pharmacy brands, win my Escentual.com top picks!

5 a day. Do you? I don’t… although God loves a tryer. The problem with vegetables is that they’re just alright.  I’m simply not gonna …

Win it! 3 EcoTools Bamboo Bronzer Brushes to win!

5 a day. Do you? I don’t… although God loves a tryer. The problem with vegetables is that they’re just alright.  I’m simply not gonna …

FOTD Busting out of the comfort zone!

5 a day. Do you? I don’t… although God loves a tryer. The problem with vegetables is that they’re just alright.  I’m simply not gonna …

Dear Obesity...

5 a day. Do you? I don’t… although God loves a tryer. The problem with vegetables is that they’re just alright.  I’m simply not gonna …

Urban Decay The Black Palette - Photos & Swatches

5 a day. Do you? I don’t… although God loves a tryer. The problem with vegetables is that they’re just alright.  I’m simply not gonna …

COMMENTS

  • Categories

  • Archives

  • Admin

  • Ads